Arrow Maze Design Case Study - Part 9 Using Warp Zones

In Part 9 of our Arrow Maze Design Case study we will do a quick overview of the Warp block which can be used as a warp zone to jump across the arrow maze. Star Trek fans would be proud,

Here is an overview of what we will be covering in the 14 part series:

Arrow Maze Construction and Design:

Arrow Maze Components:

Extreme Arrow Maze examples:

Arrow Maze Design Case Study - Part 9 - Using Warp Zones

There is not much explanation needed for a Warp block used in an Arrow Maze despite it being an interesting twist to add to a maze. Basically, it allows you to Warp (or jump) to the same shaped Warp across the maze. There is one additional thing that must be explained. When you land on a Warp block you can warp across the maze OR you can choose not to warp. This leads to the explanation where leaving a Warp block can be moved off of just like a START block - in any direction.

In my example below I use a circular shape and a diamond shape for the Warp blocks. My third shape is typically a square. If you want to use color to differentiate Warp blocks that is also an option.

9x9 Arrow Maze with Warp Zones

Warp Arrow Maze

There is an additional twist I thought of that I put in this Arrow Maze for an upcoming book. With this Warp, when you land on it you may move to either of the other WARPs - 1 shape, 3 Warp choices. When you add in the fact that each of those Warps have choices leaving from them…well there are a lot of choices to make when you land on a Warp.

Arrow Maze #49

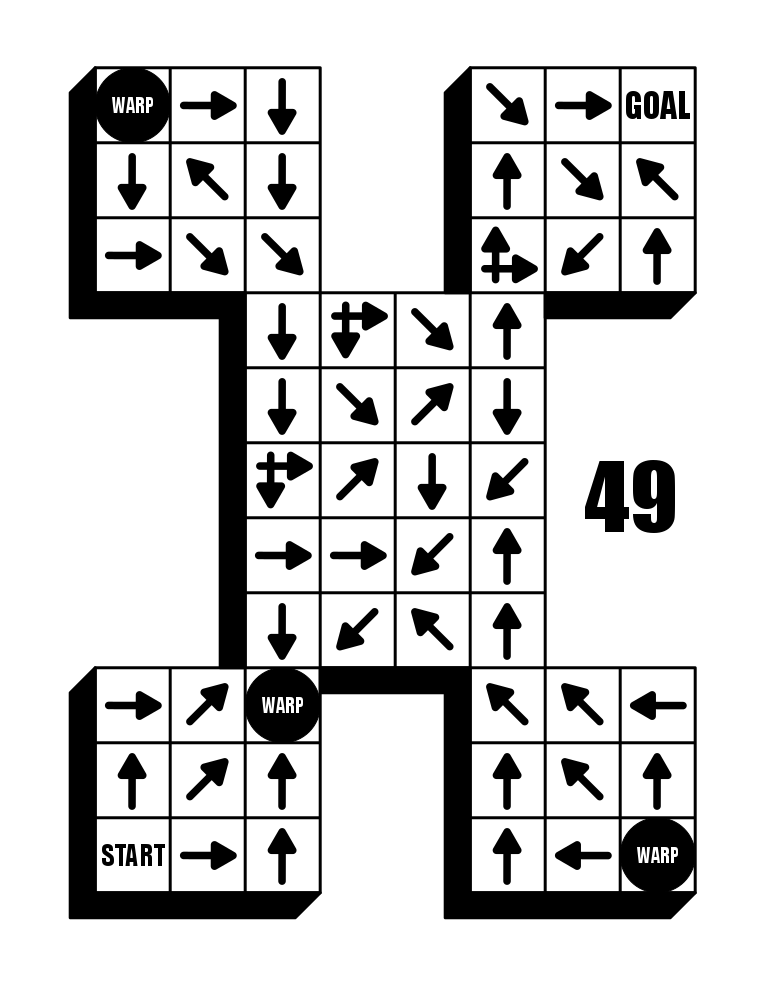
And it must be said that a great way to use Warp blocks is to travel between two disjointed sections like in the example below. Yes, I could have used double arrows to jump the gaps….but this version essentially creates an initial arrow maze (whose goal is the first Warp), and then a second Arrow Maze from the Warp to the Goal.

Arrow Maze #48

In Part 10 I will discuss the very useful Slide Arrow.

Arrow Maze Design Case Study - Part 8 Return to Start

Welcome to Part 8 of our Arrow Maze Design Case study. We will look at the Return to Start block in this section It is a block that is terrible to land on because it requires you do do exactly what it says, return to the start block of the maze.

Here is an overview of what we will be covering in the 14 part series:

Arrow Maze Construction and Design:

Arrow Maze Components:

Extreme Arrow Maze examples:

Arrow Maze Design Case Study - Part 8 - Return to Start block

Again we will use a 9 x 13 landscape Arrow Maze, and add a few Return to Start blocks. While you can use as many of these blocks as you need…this example only uses 2. Take some time to solve the maze.

13x9 Arrow Maze

Return to START Maze

The use of this block gives the solver that feeling of dread. This is not a block you want to land on. For this maze I only used 2 and led all the incorrect pathways to those 2 points. One of the advantages of using this block is that as you design the maze you DO NOT NEED to leave a space for incorrect pathways to return to the start on their own. For this particular maze that means moving all pathways from left to right.

I highlighted the middle column of the maze to show this more clearly. Notice that ALL arrows in this column move to the right towards the GOAL of the maze…except ONE block that moves SE and returns back to the right just after…so really nothing is moving left back to the START.

13x9 Arrow Maze design explanation

So what happens when you get AGGRESSIVE with the use of Return to Start blocks ? Well here is another example from my upcoming book (page 99 of 100). It uses only regular arrows and decision arrows but a TON of RTS blocks to drive the solver crazy. There are SO MANY wrong pathways that can be taken and all of them return you back to the start of the maze !

Arrow Maze #99 - VERY HARD !

Now that was intense and annoying.

And although it should be obvious…a RETURN TO START block may not be used in an Arrow Maze with START GOAL blocks…because where do you go back to ?

In Part 9 we will deal with another block that moves you across the maze, the Warp Block !

Arrow Maze Design Case Study - Part 7 START / GOAL

Welcome to Part 7 of our Arrow Maze Design Case study. We will look at the Start Goal block in this case study. It is a block that is a fun way to challenge the solver to determine where exactly they are going (and from where they are starting).

Here is an overview of what we will be covering in the 14 part series:

Arrow Maze Construction and Design:

Arrow Maze Components:

Extreme Arrow Maze examples:

Arrow Maze Design Case Study - Part 7 - Using the START GOAL

For this example I will use a 9x9 box Arrow Maze, and use 2 START GOAL blocks. If you are unfamiliar with this block it adds a new twist to solving the maze because the solver must determine which block is the START and which block is the GOAL. Incorrect pathways lead back to where they started from, with only one pathway leading between the 2 blocks. Try this small START GOAL Arrow Maze.

9x9 Arrow Maze with STARTGOAL

Arrow Maze

So how did you do ? Were you lucky enough to choose the right pathway initially ?

Because the S/G blocks are in the corners there are limited choices (to help you out a bit). The top left corner has 3 choices leading from the block while the bottom has 2 choices. 2 blocks are used, 1 for each corner S/G to bring pathways back to them.

From a construction standpoint this means that both incorrect pathways and the eventual correct answer will share a few steps along a pathway (usually at the end). Essentially a bunch of paths lead back to the start, while one pathway connects to one of the wrong pathways from the other side to create a solution. Hopefully this simple diagram shows what happens…with the green pathway becoming the answer.

Arrow Maze STARTGOAL explanation

One major consideration when using START GOAL blocks is that you are forced to create many pathways and they take up a lot of room in the maze. If you branch the pathways out with a lot of intersections you will create a lot of pathways to eventually close. So, using S/G blocks is best done for larger mazes.

My next example uses 2 S/G blocks very close to each other and a total of only 4 outgoing pathways from each. Should be easy, right ? Give it a try.

Arrow Maze #60

If you want to add complexity, consider a START GOAL block. I find them to be a lot of fun as a solver !

Coming next in Part 8, the completely maddening RETURN TO START block !

Arrow Maze Design Case Study - Part 6 - Double Arrows

Welcome to Part 6 of our Arrow Maze Design Case study. We will look at the Double Arrow today, The double arrow makes the solver jump over the block next to it in the direction the arrow is pointed (or over a gap in the maze). It adds an interesting element and enjoyment for the solver to the maze and complicates the solving of the maze.

Here is an overview of what we will be covering in the 14 part series:

Arrow Maze Construction and Design:

Arrow Maze Components:

Extreme Arrow Maze examples:

Arrow Maze Design Case Study - Part 6 - Double Arrows

To review what a double arrow is, it is an arrow that jumps you over the block or gap in the direction the double arrow is pointed. For my first example I will use a 9 x 13 landscape Arrow Maze, with this iteration using mostly Double arrows. Take some time to solve the maze and see how you like it.

Arrow Maze full of double arrows

Double Arrow Maze

For me this is a fun solve, how about you ? I find it is easy to get lost and make a misstep when executing a correct solve. Notice that because of the use of the double arrow to return to START, while our regular arrow maze example in Part 5 had 4 possible starting pathways, this allows 5 starting pathways…so you get a 20% chance of solving this correctly by guessing.

One thing about this maze, is that because of the double arrows alignment it is very difficult (almost impossible) to use ONLY double arrows to make a complete maze. To make this maze more complicated (and fun IMO) you could easily add some choice arrows throughout the maze.

Let’s look at this maze color-coded so we can see the design elements of the pathways:

Red is the correct pathway. Green, Blue and Yellow are incorrect pathways, with Purple a short “filler” incorrect pathway. All black arrows are filler (which could have easily been used with a pathway if I had used some choice arrows). Even with the pathways color coded, the pathways can be difficult to follow (at least compared to color-coded regular arrow pathways).

Arrow Maze double arrows solution map

We will come back to this arrow construction in future case studies because it is so versatile. To really take advantage of this arrow I like to use it to jump across spaces. Below is an Arrow Maze from my upcoming book (page 53 !) where I use the double arrow 4 times as an island block and 7 times to jump gaps that otherwise be uncrossable (including the dreaded go back to START).

Arrow Maze #53

The Double Arrow is a great block to use to get into and out of tight spaces and to cross over gaps in an arrow maze.

In Part 7 I will review the very Special START / GOAL block.