What I Use to Make My Mazes

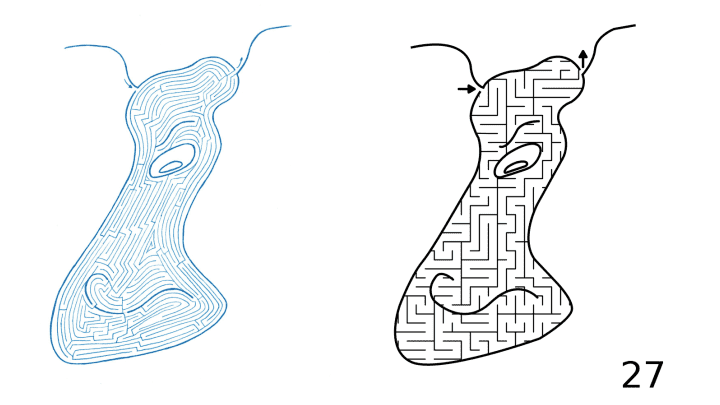
Today I want to give you some background on how I actually make the mazes you see on this site. I touched on this in Part 2 of my Maze conversion project, but wanted to expand upon it a bit here since it is something I am often asked about. This isn’t a How To Make Mazes post, which I have written about extensively, but rather the tools I use and my thoughts on them and mistakes I made in the past.

Some Background - What I used to use to make mazes

When I first started making mazes in high school I drew with pen or markers on paper in Mead art sketch pad books. I mixed the mazes in with other random artwork that I did, switching things up to stay interested. Eventually I decided I liked making mazes and would do many in a row. Then I got hooked and kept making mazes over the years, Eventually I wanted to make more complex and started using the computer to make them. I first used Microsoft Excel. Yes, Excel. Not ideal looking back, but it did give me a grid pattern to work from, but really NO flexibility in design. See the original Microsoft Excel maze below, “Lost in The City”.

a maze of a city skyline

“Lost in the City” Maze made in Microsoft Excel

I actually did a few more in Excel that are on this site. I wonder if you can you find them ? There is an Excel maze in the fan art section. See if you can find it ! I will say that as along as you only need right angles, Excel works better than you think, although the creating is painstakingly slow.

Eventually I got tired of making maze walls by selecting each individual cell and placing the appropriate grid outlines in them. Next I moved on to Microsoft Paint. This gave me the ability to use color and to create much more interesting mazes. I also didn’t need to fit everything into the same grid if I didn’t want to ! The mazes I made in Paint were much better than my Excel ones IMO, but because I was building these mazes a pixel at a time they took months. Yes, MONTHS to make. There is also not an ability to create any grid guidelines to help you draw a maze in Paint - and believe me this is important! Here is an example of one of my Paint mazes:

Empire State Building Maze

Empire State Building Maze Made In Microsoft Paint

So The Empire State Building Maze took months to complete as it was done to scale and created a pixel at a time. As you can see from how small the pathways are on your screen, this maze is shrunk down significantly from actual size. When printed it is 3 feet wide and 9.5 feet tall in full resolution. Yes, it is solvable. You start in the arrow below the A, reach the top point and return back to the start. Brutal. But, Paint is not a vector graphics program. And all of these mistakes I made are all to get to me saying this: To Make Digital Mazes use a Vector Graphics Program. Now, what I use today.

Why Vector Graphics ?

Vector graphics are made up of pathways that can be resized without losing resolution. Non-vector programs use Raster graphics (like png, jpeg, gifs) where the picture is made from individual pixels. That means if you resize the picture you will lose resolution. Making a Vector Maze means you can size it larger or smaller and it will still look good. That isn’t the case for Raster Mazes. The first circle below is raster (PNG) and it looks ok. Check out what happens when you increase the size by 400%. See the pixilation ? (those of you reading this on phones are saying not really)

PNG Circle Paint
PNG Circle Paint 400%

And now the direct comparison between the two types of files which clearly shows why vector is the way you want to design ! The larger I made this the more the Raster would pixelate.

Circle made in Raster vs Vector example

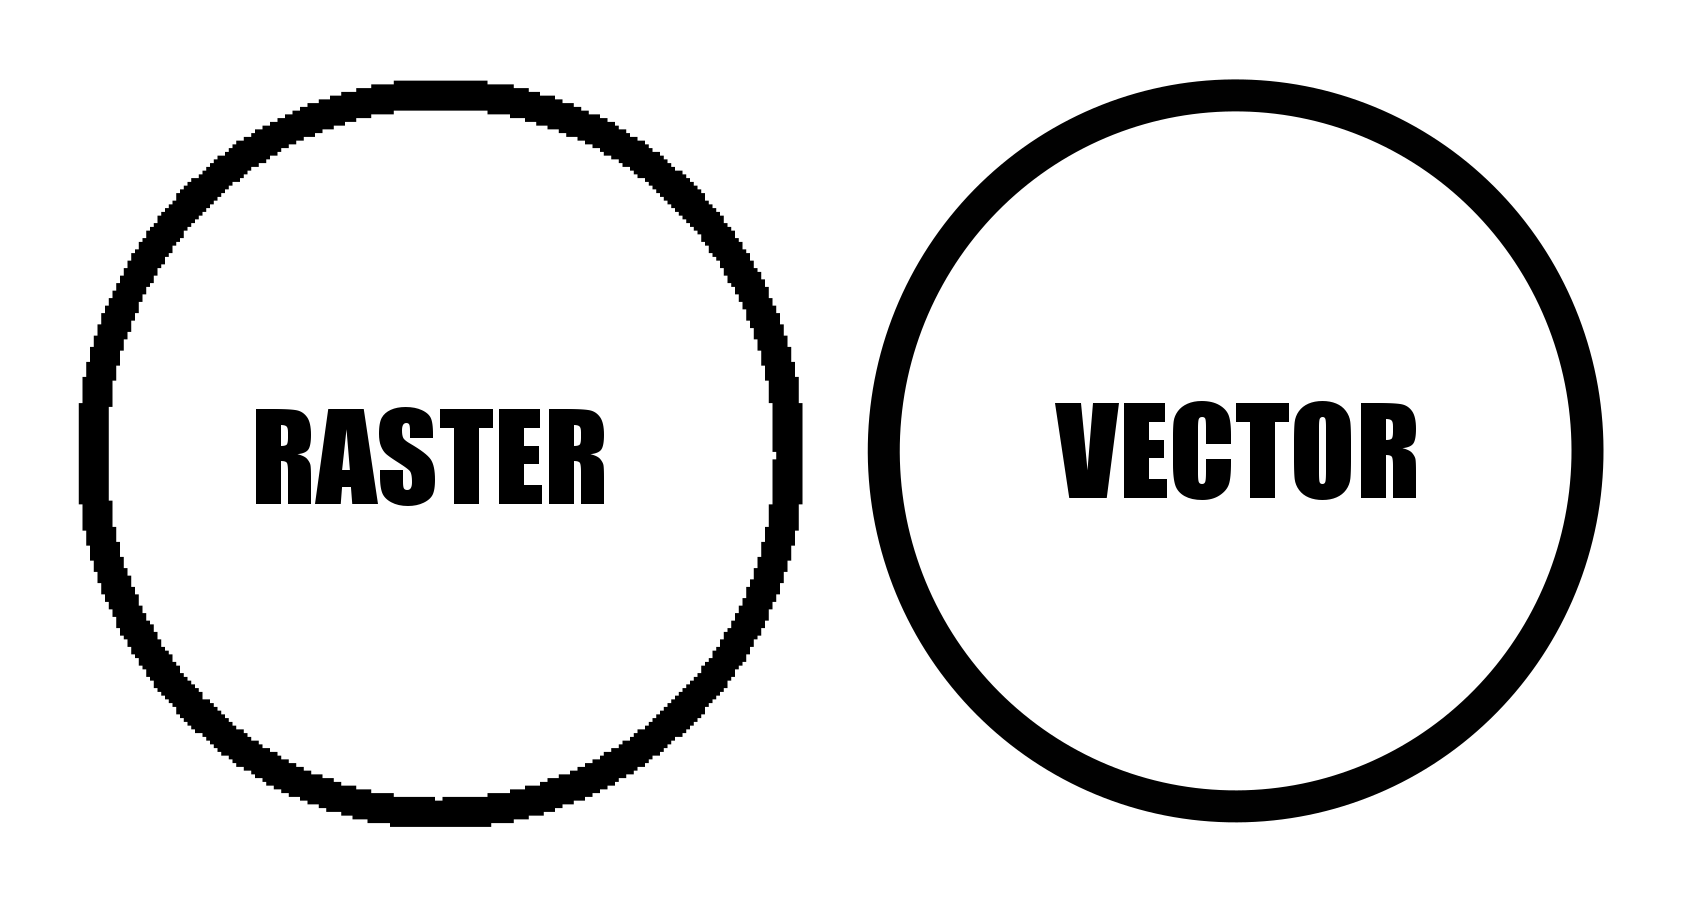
Raster vs Vector Example at 400%


What I Use to Make My Mazes

Inkscape. I do all of my maze making in Inkscape. Inkscape is a free open source vector graphics editor, but you can use a similar product if you already have the needed skills in that program. I found, that like most programs, Inkscape basics can be learned quickly playing around in the program. You can learn a bit more from YouTube videos, and to finally master it so you aren’t frustrated all the time (While muttering why can’t I just do XXXXX) that will just take time and practice. The Inkscape website also has a forum and the majority of the questions are under Beginner’s Questions, so you are not alone! I have also upgraded my initial download if Inkscape once and was frustrated for 2 weeks trying to find the things I used to know how to do. (And to be honest I still struggle to find things on occasion).

When I started making comic book cover mazes I also started using AI for the comic backgrounds. Typically I use Gemini, but a few have starryai or Bing Image Generator. It just saves me a lot of time not having to create a background of a a farm/space/city/jungle that would take me days when AI can do it quickly even if it isn’t perfect ! I have no idea what the animals are below, but that background of a savannah took less than a minute !!

Giraffe Maze Comic Book

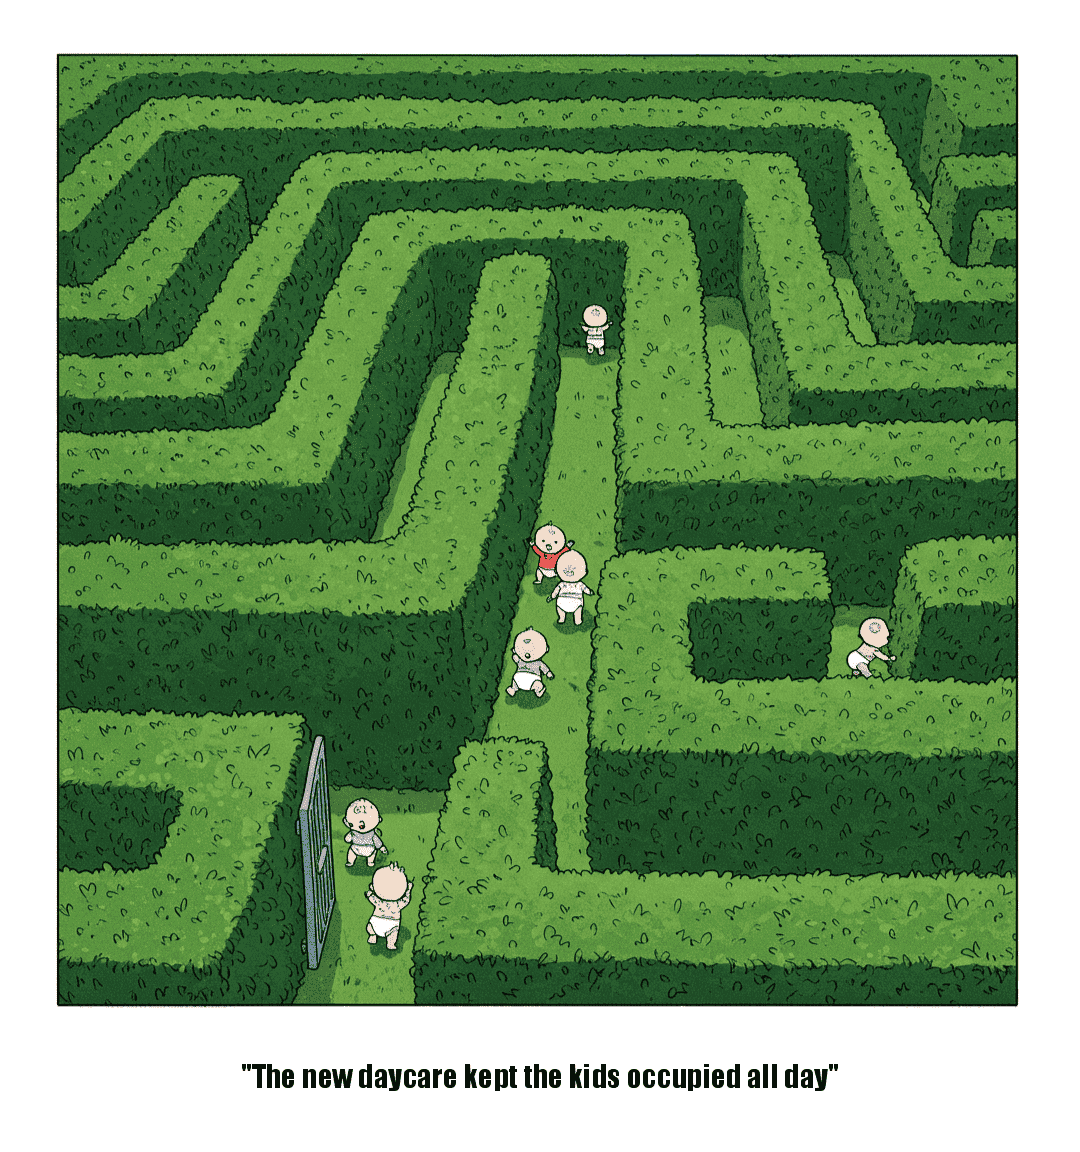
And finally, I had the idea to make comic strips that are maze and labyrinth themed. I used Google Gemini to create the comic panels based on my idea (they aren’t all perfect but good enough to show the idea). Here is my daycare comic:

Doyoumaze comic strip #3 - Daycare

Time to make some mazes (or labyrinths). If you want to see step by step instructions, I have over 70 different sets to choose from !

Convert a Hand Drawn Maze to a Digital Maze in 3 steps

I used to make all my mazes by hand but now I prefer making digital mazes. Today’s post on converting a maze from a paper drawn maze to a digital maze has 3 parts: Part 1 is the 3 step process to do a maze conversion on your own (with a note on using AI). Part 2 is the story of how I decided to do a particular project with a completed example. And Part 3 shows you some maze conversion examples I mention in Part 2.


Part 1, Option 1: HOW TO CONVERT A DRAWING TO A DIGITAL MAZE

This is not a magic solution. You will end up drawing the maze again using this process.

  1. Use a scanner to get the mazes in digital form. (alternatively you can take a picture if you have a steady hand). Now I am assuming this is not a one step process that you want (although it could be for some of you). I am assuming you want a digital vector drawing of your maze that also allows you clean up any stray marks made during the initial drawing. If like most people you do not have a scanner, I used the scanner for free at my local library ! Hopefully you can do the same !

  2. Open the File in Inkscape (or a similar design program)

    I do all of my maze making in Inkscape. Inkscape is a free open source vector graphics editor, but you can use a similar product if you already have the needed skills in that program. I found, that like most programs, Inkscape basics can be learned quickly playing around in the program. You can learn a bit more from YouTube videos, and to finally master it so you aren’t frustrated all the time (While muttering why can’t I just do XXXXX) that will just take time and practice. I just found something a few days ago than I needed for a year. Time and practice are your friend.

  3. Draw the Maze over the Scan

    Here is where the skills come in. Use Inkscape to draw the vector maze on top of the original scan (it will become the background). You can decide if you want to make changes/fixes as you go (as I did for my Alien Mazes above). When you are finally finished, delete the original scan, leaving only the new vector based maze. Now it is easy to write make the maze, and if you do not think you have the confidence, practice and read some of these How to’s. Yes, in reality, Step 3 can actually be broken down into approximately 6 parts for the actual maze construction.


PART 1, Option 2: USE SKETCH TO IMAGE AI TO CONVERT

I am currently working through this option. If you do a search for sketch to image conversion there are dozens of websites available - none of them currently have any name recognition. I have been using all of the free ones and have yet to find one that does the conversion I want better than the above method. But, I think it will exist soon maybe ? Or possibly it already does and is just in the paid version I haven’t accessed yet. Every once in awhile I try this again…but so far nothing. Drop me a note if you find one that works and I will feature it here.

Part 2: THE STORY

When I first started making mazes in high school I drew with pen or markers on paper in Mead art sketch pad books. I mixed the mazes in with other random artwork that I did, switching things up to stay interested. Eventually I decided I liked making mazes and would do many in a row.

For fun I also created my own cartoon character who I would put in funny comic strips, well I thought they were funny. His name was Oscar and he was an alien who lived on Earth. Maybe this was influenced by the tv show ALF. I must have also been inspired by Where’s Waldo when I made the picture below I call An Alien Circus. Check out the great ruled paper ! Good enough to be in an art gallery - NO ! Bad enough to be in an bad art gallery - definitely closer ! But, it was fun to make and made me have to think about different shapes for different characters like the alien elephant and many alien circus clowns.

Hand drawn alien circus scene

Well, after drawing a variety of mazes of various things I decided to combine the two with a maze of my alien character Oscar. Below is his face in maze form, although he does have a full body. I liked how it came out and filled a book with hand drawn Alien mazes, with 44 in total.

a hand drawn maze of the face of an alien

Looking back they were ok. Most of them look like amoebas more than aliens, but who are we to say what aliens really look like ? (if you are an alien - how did I do?) One thing I do appreciate is that I picked a theme and a particular look and I expanded on it. Since I can’t publish the 3-ring binder of that initial work I decided to do my best to publish it now in a better form. First, I scanned all the files (thank you public library !). Next, I had to split the files into individual files (oops!). Then I opened, named and centered each maze.

I’m going to be honest I was doing a bit of a Marie Kondo when I started this project, trying to rid myself of old papers by digitizing my art, and discarding the papers. Now, in most cases I did discard the paper and digitize the art. But for this, I still have the original hand drawn book of mazes.

This is when I decided I needed to create 2 books. One of the original artwork, with added covers (front and back), and numbered pages, and a second book converting and updating the maze artwork.

To create the conversion book I decided on a few rules:

  1. Make the size of the new maze the same as the original.

  2. Put the entrance and the exit to the maze in the same place as in the original.

  3. Use a simple grid pattern for the maze, not the original pathways. While this changes the look of the mazes, it does make them much more solvable for younger solvers and standardizes their look even more.

  4. Change the color of the walls from Blue ink to black.

How did it turn out ? Well I’ll leave that up to you to decide in Part 3. I think they came out ok. I certainly enjoyed making the digital conversions and hope to do more.

Here is a download for the converted version of the book called The Wild and Wacky Aliens Maze and Coloring Book. Obviously, as I mentioned I changed the mazes to be for Kids though I don’t have a specific age. Enjoy !

When I tried to create a book of the hand drawn mazes, but the file sizes where too big to create a book with the resources I have.

Enjoy the free downloadable kids maze book !!

download digital conversion
The Wacky Aliens Maze and Coloring Book

So that was the story, now let’s look at some examples.

Part 3: 5 MAZE CONVERSION EXAMPLES

Each from the above downloadable book, The Wild and Wacky Aliens MAZE Book. Again, during my conversion I changed the maze pathways from hand drawn medium difficulty to a standard maze construction made for kids. I did this to make the maze difficulty more congruent to the subject matter (aliens).

Example #1:

Alien Maze digital conversion example

And after our first example…do you prefer the perfect circle from digital or the uneven hand drawn ? Notice how I used different pathway widths in the conversion. The mouth is more narrow to give it a darker look.

Examples #2&3:

Alien Maze digital conversion example 2
Alien Maze digital conversion example 3

Much easier version in digital. I like these guys, or uh aliens. Examples #4&5:

Alien Maze digital conversion example 4
Alien Maze digital conversion example 5

Once you have a good handle on how to use a vector design program, converting a maze from hand drawn to digital will become second nature. Good luck !

More posts you may like:

The 10 Most Famous Labyrinths from Around the World

Discovering 7 of the World's Most Interesting Mazes

What I learned using AI to make maze art

The Ultimate Directory of Maze and Labyrinth Builders: The Top 13 Builders in the world

Mazes and labyrinths are becoming more and more popular. You can find them in corn fields, public and private gardens, parks, fairs, churches, beaches, courtyards, art galleries and of course in books. Setting up an installation that works in your space takes detailed planning and a keen understanding of how to use materials to give the feeling you want from the project. Today we will look at 13 companies that specialize in physical maze and labyrinth designs. These include projects made with stone, hedges, corn, earth mounds and many other interesting materials. If you are looking to build your own installation, you should be able to find a builder here.

Adrian Fisher - www.mazemaker.com

The world’s leading maze designer and holder of many Guinness World Records. Projects can be seen around the world and include all types of installations: Mirror, Hedge, Panel, Water, Paving, and Corn (or Maize in the UK). The company has been designing mazes for clients since 1979. Adrian Fisher designed the first Maize Maze, while pioneering water mazes, walk-through parting waterfalls in mazes, foaming fountain gates, and wrought-iron maze gates to make mazes dynamic. With over 700 designs the portfolio is impressive. Here is and example of their hedge maze work from the Blenheim Palace in England:

Adrian Fisher Designs, Blenheim Palacelenheim palace, England

Jim Buchanan - www.jimbuchananprojects.uk

Specializing in land art and labyrinths in the UK. Beautiful use of earth/mounds to build interesting labyrinths. Also the only person I know who uses light projections into swimming pools to create labyrinths that can be walked or swam. Below is his beautiful “Earth and Wildflower Labyrinth” commissioned by the Chesterfield Borough Council.

jim buchanan Earth and Wildflower Labyrinth Chesterfield Borough Council, 1996

Marty and Debi Kermeen - labyrinthsinstone.com

Specializes in pavement and stone labyrinths, mostly in the United States. Have been building labyrinths since 1998. They also make hand painted labyrinths on canvas and sell cards and posters of some of their work. Below is an example of their labyrinth work from Aurora University:

labyrinths in stone Aurora University paved labyrinth

The Labyrinth Company - www.labyrinthcompany.com

Offer a variety of services to build or help you build a labyrinth. Pre-designed kits are available to build labyrinths of paving stone, bricks, ceramic floors, hardwood floors, cork floors, carpets, poly canvas mats, vinyl and linoleum floors to name a few. They have many different labyrinth designs including replicas of many classics. If you need quick solution they probably have it. Here is an example of their Abingdon à la Chartres™ paved labyrinth:

Labyrinth Company Abingdon à la Chartres™ paved labyrinth

TheMAiZE -www.themaize.com

Design and consultant company specializing in the design of corn (maize) mazes. They have a great map feature allows you to find a corn maze near you ! Currently designing in the US, Canada, Poland and the UK with over 3000 corn mazes designed since 1996. Here is an example of one of their corn mazes:

The Maize California corn maze example

Precision Mazes - www.precisionmazes.com

Corn Maze builder from Missouri who focuses on the use of GPS to make precision designs. They have some impressive commercial maze work in their portfolio that include Cartman from Southpark and Salvador Dali. You can see more about their work in this short video:

Mazescape - mazescape.com

Company founded by UK based maze designers Angus Mewse and Tom Hockaday. They offer 4 different Maize (Corn) Maze design packages based on customer needs. All of their corn (maize) mazes are unique and not pre- designed. They also have designed and built mazes with a wide range of materials, including to quote the website “Willow, Bamboo, Beech, Yew, Turf, Timber Panels, Wooden Posts, Trellis and Climbing Plants, Fabric, Rope, Hay & Straw Bales, Recycled Tires, Adobe, Brick and Stone”.

maze scape corn maze

Don & Lorraine Watts - thecornmazeguy.com

Company out of Pennsylvania that specializes in affordable corn maze design for the Northeastern part of the US. They offer printed corn maze games to enhance the corn maze customer experience.

Corn Maze Guy Iwo Jima Corn maze

Maize Quest - mazecatalog.com

Company from Pennsylvania that has been designing corn mazes since 1997. They specialize in making mazes that include additional features for the guests, like a scavenger hunt and projects or tasks for kids to complete as they walk through the amaze. They also sell rope mazes and fence mazes like the one below:

Maze Quest fence maze

MazePlay - www.mazeplay.com

Started in 1998 when the owner planted a corn maze for the first time after convincing his father to let him experiment in a corner of the corn field. Based in Idaho. Service designs corn mazes and includes the options to add games to enhance the experience for guests (treasure hunts, solving a mystery games). Check out their video playlist here:

Instant Hedge - www.instanthedge.com

“Established in 2013, InstantHedge is the only nursery in the United States devoted to growing pre-finished hedges” - from their website. A company that specializes at installing hedges for clients. They also can design and install hedge mazes. Located in Oregon. Check out their great hedge care guides for hedges.

Instant hedge maze

Robert Ferré - www.labyrinth-enterprises.com/

Works on design, consulting, and installation of labyrinths. Hosts a Master Class on how to lay out a classical labyrinth. Author of the books Canvas Labyrinths: Constructuion Manual and The Labyrinth Revival. Below is his work from the Marianjoy Rehabilitation Hospital in Wheaton, Il.

Robert Ferre , Marianjoy Rehabilitation Hospital in Wheaton , IL

Lea Goode Harris - www.creativelabyrinths.com/

A creative designer and consultant for labyrinth insulations. Author of multiple books, including Ladybug Labyrinth: A Journey Home and A Discovery of Labyrinths. Creator of the Santa Rosa Labyrinth consisting of 8 concentric circles. Here is an example of it on the roof of the American Psychological Association in Washington, DC.

Santa Rosa Labyrinth on the roof of the American Psychological Association, Washington, DC

And one more that specializes in temporary mazes for exhibits:

BONUS: Minotaur Mazes - Minotaur Mazes

Minotaur Mazes specializes in creating real world mazes that can be used in exhibits and museums. The long list of clients (hundreds) on the website includes Museums, Science Centers, a list of Collaborations, Amusement Parks, Fairs, Festivals, Events, Libraries, Zoos, Aquariums, Botanical Gardens and Children’s Museums. So if you are running an event or one of these attractions this company is something you may want to look into ! Check out this YouTube video showing just one example of an installation of Mazes & Brain Games done in Raleigh Durham, NC. There are 11 different exhibitions to choose from on the site and you will no doubt know that my favorite is Mazes and Brain Games that you see previewed in the video below.

There is a lot of talent here to help you with professional labyrinth installation, design and construction. I hope this directory helps you make you vision a reality. If I missed someone that you would recommend, drop me note (doyoumaze@gmail.com). Thank you!

How to Draw a Circular Hopi Tapu'at Labyrinth

I have previously shown how to make a Square Hopi Tapu'at Labyrinth and today I will show you step by step how to make the circular version. Let’s look at the 2 side by side and compare them.

Circular Hopi Tapu'at Labyrinth

Circular Hopi Tapu'at Labyrinth

Square Hopi Tapu'at Labyrinth

Square Hopi Tapu'at Labyrinth

The interesting thing about these is that they are so different. The square version has 2 entrances and 2 goals, while the circular has one of each. Obviously there is also the overall shape and corner shapes apparent in the individual names.

When I made my circular version I noticed that it did not fit into the typical labyrinth making process. I have a potential usable seed pattern, but each step is more complex than normal. I also noticed that the labyrinth is a series of (mostly) vertical straight lines and half and quarter circles. Let’s explore this with a diagram I made to show what makes up the labyrinth and compare it to the 7 circuit classical labyrinth:

Hopi Tapu'at Labyrinth: Everything in red is a straight line. Everything is black is either a half circle or a quarter circle. This is a right handed labyrinth (first turn is to the right).

Classical Labyrinth: Everything in red is a straight line (basically just the seed portion minus the dots). However the black portions are not perfect circles. When you make this labyrinth you are connecting points with curved lines. This is a left handed labyrinth (first turn is to the left). This can be made right handed, but left handed is typical.

Circular Hopi Tapu'at Labyrinth seed pattern  ?

I trial and errored the making of this labyrinth. It is complicated. So, while it is not ideal, I am going to use this very large seed pattern. Otherwise, each step is complicated. So the most difficult part of this is creating the seed pattern correctly. Smooth sailing from there !

For this labyrinth I will be drawing each step in red on top of a completed labyrinth with thin lines to show you where that step is located in relation to the completed labyrinth. After each step the previous steps lines change to black from red.

Step 1: Draw the starting seed pattern.

I included the grid in this example to show you how to draw this seed pattern. It is the most complicated I have ever used. Start with a plus sign. The horizontal is 8 units long, while the vertical line is 6.5 units long, 3 units below and 3.5 units above that line. At the end of each side of the horizontal line draw a 4 unit vertical line. Beside the left line you just made add 4 lines to the left, all 4 units long. Make sure they are equidistant apart. On the right side do the same thing but with only 3 additional lines instead of 4. Now you can fit 3 vertical lines on the right side, 2 grids long and aligned t the top of the just made 4 grid lines. Moving to the left side you will do the same thing with 1 exception, the line just to the left of the top of the plus sign should aligh with it at the top (1.5 grids instead of 2). Next under the horizontal line, aligned to each end you will draw three 2 unit long horizontal lines ( 6 total lines). And finally the last line of this complicated seed is a horizontal line on the left side, aligned with the previously 3 on the left but draw 3 grids long instead of 2.

Circular Hopi Tapu'at Labyrinth seed pattern

Step 1 - Circular Hopi Tapu'at Labyrinth

Step 2: Draw the Goal

Between the two short lines in the center draw and arch to connect them. Teh top of the arch should align with the top of the vertical lines on its left and right.

Hopi Tapuat Mother Child Birth Circular Labyrinth step 2

Step 2 - Circular Hopi Tapu'at Labyrinth

Steps 3-9: Create the top arches

These are all the same maneuver and so they get bunched into 1 explanatory step. Create a semi circle to connect the top of the end of the next inner line on the left to the line on the right. The peak should align to the peak of the goal. Essentially you do this 7 times to create the top of the labyrinth ! Shown here as a rainbow; start with purple, then blue, etc.

Hopi Tapuat Mother Child Birth Circular Labyrinth steps 3-9

Steps 3 - 9 - Circular Hopi Tapu'at Labyrinth

Steps 10/11: Connect the internal turns

You should have 2 empty spaces to fill in the center of the labyrinth on either side below the goal, each has 3 vertical lines. Take the end of the 2 outside lines on each side and connect them with an upside down arch. Shown in red and blue below.

Hopi Tapuat Mother Child Birth Circular Labyrinth steps 10 & 11

Steps 10/11 - Circular Hopi Tapu'at Labyrinth

Steps 12-15: Draw the left corners

On the bottom left connect the end of each vertical line with the end of each horizontal line working you way from inside out. Each of these is a quarter of a circle, or arch. In order, red, blue, green, yellow below.

Hopi Tapuat Mother Child Birth Circular Labyrinth steps 12-15

Step 12-15 - Circular Hopi Tapu'at Labyrinth

Steps 16-18: Draw the right corners

Same as above but on the right side, and only 3 times, shown as red, blue and green below.

Hopi Tapuat Mother Child Birth Circular Labyrinth steps 16-18

Step 16-18 - Circular Hopi Tapu'at Labyrinth

Steps 19 - 21: Close the outer pathways

On the bottom left you should have 3 horizontal lines of the same length (the southernmost line is slightly longer). Connect the 1st and third with a semi-circle to create a turnback pathway (shown below in red). Do the same thing on the right side opposite (in blue). And our final step is completing the labyrinth by connecting the bottom of the plus sign with the end of the horizontal line on the left with a quarter circle (shown in green).

Hopi Tapuat Mother Child Birth Circular Labyrinth steps 19-21

Step 19-21 - Circular Hopi Tapu'at Labyrinth

That completes the labyrinth.

Circular Hopi Tapu'at Labyrinth

Circular Hopi Tapu'at Labyrinth