How to Make a Laser Maze

In a series of posts I will show you how to make a maze in a wide variety of design constructions. The 44th type of maze construction is the Laser maze. Let’s define what I mean, then get into the example. This particular maze type was brought to my attention on the reddit maze page by user naveedurrehman. It is a puzzle type drawn maze and unique in that the pathways are invisible initially and created by the maze solver !

LASER Maze - A type of PUZZLE maze where THE SOLVER USES PHYSICS TO DETERMINE WHERE A LASER beam WILL BOUNCE in order TO SOLVE THE MAZE.

I want to mention there is a physical version of this maze type, and it may make you think of the movie Entrapment starring Sean Connery and Catherine Zeta-Jones. Also, Mr. Beast featured one on his channel.

And there is also a physical kids game version of this maze made by Thinkfun where you use mirrors to solve challenges. The game was the winner of the Good Housekeeping Best Toys Award !

How to Make a LASER Maze (DRAWN)

Step 1 - Draw the Outline and Possible Goals

The outline of a laser maze includes 3 sides with an opening for the initial laser to move through. It is possible to do multiple shapes but the most basic is 3 sided for this example. Goals, or possible goals line the outside of the walls. I suggest nothing less than a 4x4 grid, meaning 8-12 possible goals around the border. I like using pink blocks to highlight and guide where mirrors can be placed during maze creation.

Make a laser maze step 1

Step 2 - Draw the Initial Laser and Mirror

Draw a laser, at the top reflecting off the first mirror/wall. This is essentially your “START”.

Make a laser maze step 2

Step 3 - Draw the Solution

Add mirrors (walls) that the laser will bounce off of to make the maze solution. In my example below, I fill most of the maze.

Make a laser maze step 3

Step 4 - Add the Unused Mirrors (walls)

If the solver followed the physics of the laser and bounced in the correct directions, any walls you add will never be used. Be mindful to not block any used pathways that would re-direct the solution. I also deleted my pink block guides.

Make a laser maze step 4

Step 5 - Add the Directions

This is a type of maze that needs instructions to solve. Add them to the maze. I used simple directions.

Step 6 - Create the Solution (OPTIONAL)

Make the solution to the maze.

Additional Laser Maze Examples

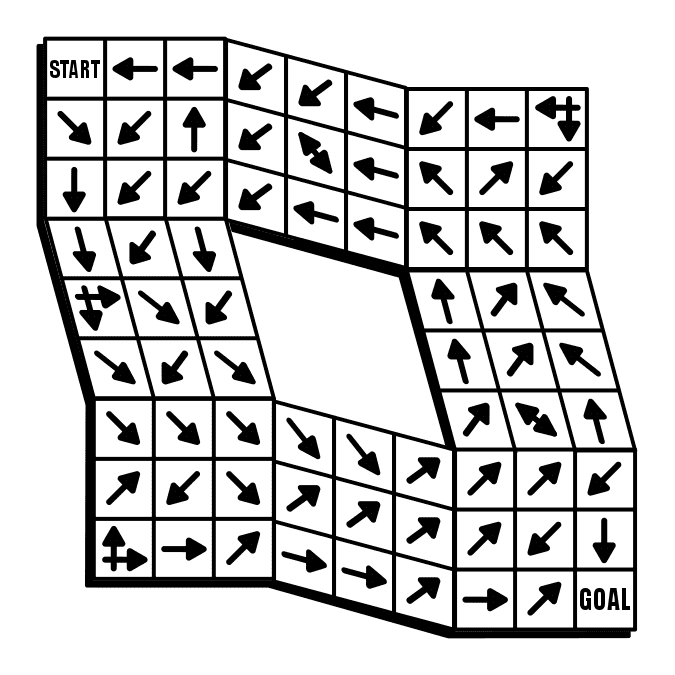
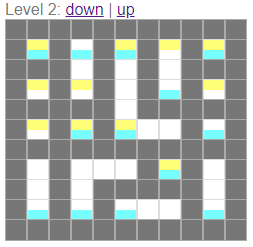
Each laser does not need to bounce 1 level or block, it can move across larger distances. There is no need to fill each block with a mirror, gaps are interesting ! Here is a 5x5 version that includes gaps:

Kids 5x5 Laser Maze

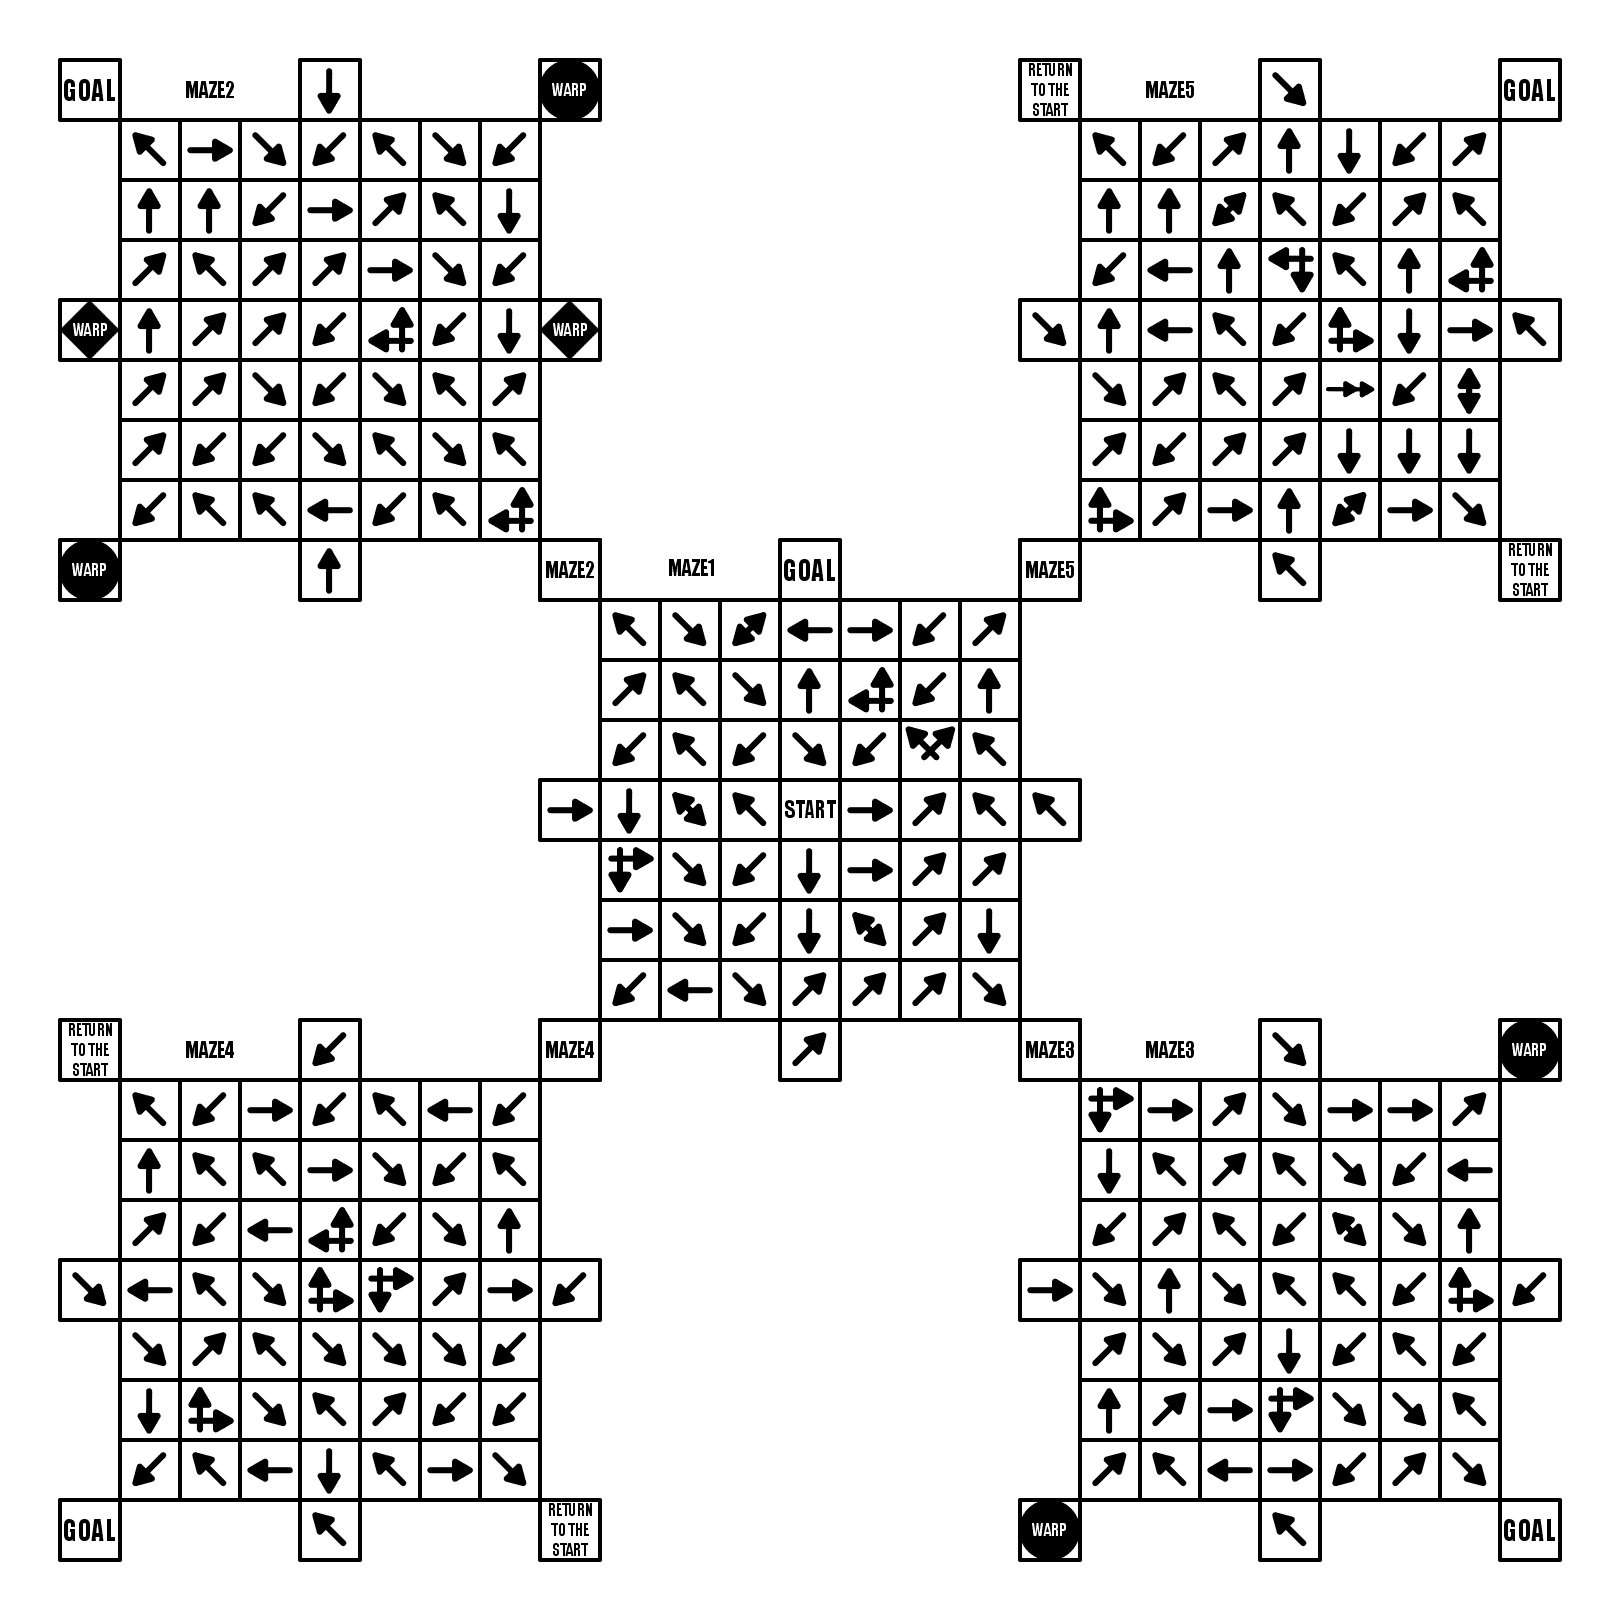
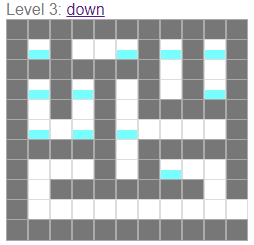
For my next example, I lined 3 sides with possible goals, so 15 total possible goals instead of just 10 using the 2 sides.

Additional Design Discussion:

Do they need to be square/rectangular ? No. But the use of right angles makes solving easiest. There is no question which direction the bounce is going to go to. A triangle, hexagon, and other geometric shapes would also work, with some complications to work through.

How big can they be ? As large as you can imagine.

Only right angles ? You can use other angles, but they complicate the design for both the creator and solver.

Ready to make your own laser maze ? Good Luck !

I did a 3 part blog series on maze constructions if you want to design your own type of maze. Part 3 includes all of the conditional maze options.

Part 1 - Starting and Ending a Maze - Speaks to the 9 most popular ways to start and stop a maze

Part 2 - Maze Path options - Explores the 12 different pathway options for a maze

Part 3 - Conditional Path options - Speaks to 11 different conditional options to add to a maze to make it more enjoyable

Interested in learning how to make or draw other types of digital mazes ? I have step by step instructions on how to make over 40 different maze types.

If you prefer making labyrinths, you can find step by step labyrinth making instructions.

Twisty Little Paths: Creating New Types of Experimental Mazes

I spent an entire month making Experimental Mazes were I came up with 11 different types of mazes. Each type had at least one daily maze posted on the site and some of these experiments had up to 5 different versions. Today I want to pull each of these new maze creations together and review them, see how I did, what worked and get some feedback from you.

Part 1 - Perspective Arrow Maze

This idea is pretty simple: Arrow Maze + a change in perspective. I did 5 different versions and below is my favorite example. A typical Arrow Maze is flat and I thought adding some perspective would be interesting. I enjoyed making this and getting the maze aligned as I made it in sections.

Perspective Arrow Maze

Perspective Arrow Maze

Part 2 - Multi Arrow Maze

This idea is connected Arrow Mazes. Day 1 is Arrow Maze 1 you solve normally. Day 2 adds Maze 2 (the upper left corner). The solver starts in the same place, but tries to reach the Day 2 Goal in Maze 2. This continues each day. Day 3 adds Maze 3 and a new GOAL. By day 5 you have 5 Arrow Mazes combined into one. Can you solve each maze in order ? Good Luck. To clarify, landing on a corner of the center arrow maze opens up the new maze section to you.

Multi connected Arrow Maze

Multi Arrow Maze

Part 3 - Color Grid and Grid Maze Combo

Another combination maze, this one featuring a color grid maze and a grid maze. Since the Color Grid is already “gridded” this made it easy to create a 2-in-1 maze. Solve the 2 mazes in any order. In this case the start and goal is the same for each maze type.

Color Grid and Grid Maze Combo

Color Grid and Grid Maze Combo

Part 4 - Folded Grid Maze

A Grid Maze that has the appearance of being a folded piece of paper based on changing the perspectives on a few sections. I did 2 versions. Easy to make. Looks more interesting than a regular grid maze, but is nothing earth shattering.

Folded Grid Maze

Folded Grid Maze

Part 5 - Layered Grid Maze

A Grid Maze that uses multiple layers to give the maze a more interesting look. Honestly, this is not very experimental in hindsight. It looks marginally more interesting, but at the end of the day is still just a grid maze.

Layered Grid Maze

Layered Grid Maze

Part 6 - Arrow and Grid Maze Combo

Another 2-in-1 maze experiment. This one combines the Arrow and Grid Mazes. I made it to be solved Arrow Maze first, then Grid Maze after, returning to the original start, but you can technically solve in either order. I like the idea of the start of one is the goal of the other. I did 4 different mazes of this type.

Arrow Maze Grid Maze Combo

Arrow Maze Grid Maze Combo

Part 7 - The Sectional Maze

A Sectional Maze uses lightly connected sections and weaving pathways to travel throughout the maze. Nothing too crazy, but a new type of maze for me. Maybe the newest portion is the one way pathways between sections. I feel like this is a small version of something much larger and more interesting.

The Sectional Maze

Sectional Maze

Part 8 - Standard Perspective Maze

A standard maze where I have played with the perspective. I think this is the least appealing maze I made playing with perspective. Boring in this example and possibly boring in most examples. When I originally thought of it I was thinking it would look like a folded piece of paper. This particular example is also a Kids maze.

Standard Perspective Maze

Standard Perspective Maze

Part 9 - Stacked Grid Maze

A Grid Maze (blue) inside a grid maze (black). Day 1 included only the black walls, while Day 2 uses both black and blue to create the walls. I stopped after 2 days as the solution stays generally the same on day 2 in this version.

Stacked Grid Maze

Stacked Grid Maze

Part 10 - Pipes and Arrow Maze Combo

Another 2-in-1 maze that combines Pipe Mazes and Arrow Mazes. These can be solved in any order. I looks a bit odd but these are 2 of my favorite maze types. I will say as a designer this maze type takes a long time to make. If I could make this faster I would make more.

Pipes and Arrow Maze Combo

Pipes and Arrow Maze Combo

Part 11 - Stacked Standard Maze

5 Mazes in 1. Each Day for 5 days I added a new layer to solve. Each smaller arrow adds a new layer of walls to impede you. So the maze starts with black walls only. The next maze on day 2 uses black and grey walls. Then + Blue, + Red, and finally + Green. I thought this was a fun idea. But the actual execution is tough on the eyes and not as enjoyable to solve as I thought. I wonder if wider spacing for all maze pathways would improve it.

Stacked Standard Maze

Stacked standard maze

The odd sizes mean I did not make these mazes into a traditional free downloadable book, but I did gather them into a 31 page booklet. It is not recommended for printing. The download is 392Kb and is best used on screen.

Are there some mazes you like that should be continued and explored ? Send me a request.

How to Create Maze Art in 6 Easy Steps + CASE STUDY

Have you ever wanted to create a maze ? What about a maze that has enough detail and complexity that it could be considered art ? I love creating maze art and I want to share with you my process. Let’s start with a definition of what exactly I mean by maze art. OK maybe a few possible definitions.

Maze Art - A solvable maze of a subject that is good enough that someone would consider hanging it on the wall as an art piece.

Maze Art - A piece of art that just so happens to contain a solvable maze.

Maze Art - A solvable maze made to look like something that is not a maze, like an object/thing/person/place/landscape.

Maze Art - A solvable maze made to look aesthetically pleasing or interesting and not just to be solved.

All of my definitions includes solvability. I do not include pictures that have design elements of mazes and labyrinths in them but are not solvable. Also, I think when you look at maze art you see the picture first and the maze is secondary (when looking at it, certainly this is not the case when designing it !!!).

One place you will not find help on defining this is in the Image Search section of your favorite browser. The majority of what you will get back a variety of renderings of boring maze clipart. Well unless you are looking for maze clip art - then you have a very efficient search !!! Every time I do the search I am disappointed with very few exceptions. For awhile I thought AI hasn’t been trained on what is considered art yet (Maybe that’s a good thing?), but we all have seen the new AI art tools by now, so that is not it. Here is what I found from 3 different searches:

Bing: About half of the results are of basic clip art. Nothing I would consider putting on my wall except result #2 and the skateboarder in row #2. You also get some cool 3D renderings of mazes but none of them are solvable since they include no start/goal and are not fully viewable.

Maze Art search results on Bing

Google: Much better results. A few clip art images are mixed in. This also includes a mix of art pieces that include maze and labyrinth elements but they are not solvable. But this is closer to what I would hope for from the search at least.

Maze Art search results on Google

DuckDuckGo: More majority clip art of basic mazes. Generally a very similar look to the Bing results in a different order.

Maze Art search results on DuckDuckGo

Here are some examples that I have made that I believe would be considered maze art. They are examples that I think should show up in the searches above. If you are interested in solving them, downloads of all of these mazes can be found on this site.

Building Maze art:

The Alamo Mission Maze

The Alamo Mission Maze art

Lotus Temple Maze

Lotus Temple Maze art

And here are 2 Sign maze art examples:

Spillway Lanes Sign Maze

Spillway Lanes Sign Maze Art

Chicago Theatre Sign Maze

Chicago Theatre Sign Maze Art

You can also find on the site examples of landscape maze art, scene maze art, animal maze art and monument maze art. Take some time to look around !

So that is what I think maze art is, with many other examples and styles possible.

Today is first in a series of posts that will take you through how to make maze art step by step. Now this could mean converting a picture, or drawing something you think of free hand. One thing I can’t help you with is your drawing skills. If I say “Draw me a picture of Abraham Lincoln”, some of you have the skills to do that and some of you don’t, and even those with the skills will have different levels of detail and realism to their finished product. I can’t teach the skill of drawing. Sorry. But, regardless of your skill level, I hope you enjoy the process and consider trying to make some art yourself. Let’s get started.

How to create maze art in 6 “easy” steps:

Step 1 - Choose your maze subject

Seems easy right ? If you are going to make a maze you need to pick what the subject of the maze is first. But I don’t suggest you grab the first photograph you have. Here are some things to consider when making a maze:

  • Objects with right angles are a natural thing to make into mazes. Think about architecture. Buildings are a natural subject to make a maze of. They are made of geometric shapes and are filled with right angles whether it is a house or a skyscraper.

  • Consumer goods make good subject matter also, but chances are you won’t want to invest time in making them. A Bike, lamp, radio, television, desk, and chair could all become maze art. I’m not sure anyone gets very excited about them, but they are possible.

  • Faces are possible, but very difficult for most people (If they are easy for you congratulations !). Any maze art includes a drawing of the subject matter first and foremost, so doing a maze of a friend means you have the ability to draw your friend and it to be recognizable as them. This can be easier if your friend has an extremely recognizable look, say someone like Abraham Lincoln - a large beard and hat with a gaunt face gets you relatively close.

  • Ideally, the picture you choose should not be too busy. Too much detail can be difficult to make into a maze. You do have the option to ignore the detail. But think about a picture of 4 faces vs a picture of 1 face. 4 faces in a picture with all of their individual detail will be very difficult. 1 face is enough.

Step 2 - Take a photograph of the subject (OPTIONAL)

  • If you don’t already have a photograph of your subject matter, take one. Remember from step 1 to make the picture as minimalistic as you can.

  • Taking the photograph also means prepping it as a “before” photo if you are doing a before and after version of the subject. Crop as needed, adjust the brightness, etc.

  • If you are doing something from memory or doing fictional subject matter, no photo is needed obviously.

  • And finally, you can find a photograph to base your maze off of if taking a photo yourself is not feasible. For presentation purposes, having the rights to a photograph will help you to display it in the future.

Step 3 - Draw the Main outline of the subject

  • Determine how you will deal with an object’s perspective. By this I mean if you are making a maze of an object that is square or rectangle in real life it is likely the photograph will not be perfectly square/rectangular. Do you want to represent a building as it is (perfect angles), or how you see it (your perspective - the building is slightly smaller at the top). Maze lines are easier to make without perspective, but either can be done.

  • Use the photograph to draw the major outline of the maze. If you are doing this digitally (As I assume you are) you do not need to leave openings for the paths/entrance/exit.

  • The outer walls of the maze should be done with a thicker maze line to give the picture definition. Inner walls that define the picture should be a smaller thickness (with some exceptions based on the subject).

Step 4 - Begin the design of the maze

  • If you aren’t sure what maze construction you are going to do, check out this section for some ideas. I will say with maze art you will find it looks best when done with free drawn or standard pathways. I also like to use the natural features of the subject as the maze walls where possible - see the Alamo Mission maze above - the bricks naturally became the walls; and the Museum of the North Maze above where the metal panels naturally created a grid maze format.

  • Choose the start and goal, ideally on opposite sides of the picture.

  • Choose the wall design you will use to make the maze walls. Regardless of the design you choose the walls will need to be a smaller width than the previous outer and inner walls. There are many types of pathways you can use from a standard pathway to hand drawn, vertical, horizontal and many more.

  • Consider how difficult you want to make the maze for the solver. For most mazes you don’t want to discourage the solver by making it too difficult.

Step 5 - Draw the maze

  • It took 5 steps to get here, now do the actual work. Funny this is the shortest step to write but typically the longest to complete !

Step 6 - Make any aesthetic changes to complete the maze - Color, Size, Border, Title

  • Black and white is the standard coloring of most mazes, but some mazes will look even better if they are in color. Consider coloring your maze to enhance the way it looks.

  • Some mazes work best in larger/smaller scales. Consider changing the size of your maze to fit the desired presentation you are looking for. This is the advantage of digital mazes vs hand drawn mazes.

  • Consider adding a title and border depending on how your maze will be presented.

Congratulations on creating a piece of maze art !!

Making Maze Art - Case Study #1 - The Largest FREE Stamp in the World

Now I’m going to take you behind the scenes in my making of some Maze Art. Here is a real life example from a maze I made for the site, of the sculpture that is The Largest FREE Stamp in the World. Using the steps I outlined before here is how the Maze got made !!

Step 1 - Choose your maze subject

While previously living in Cleveland, Ohio I found my inspiration in the park. If you walk to the Rock and Roll Hall of Fame (and if you are ever in Cleveland that is probably why you are here) you will pass the FREE Stamp on your walk. The stamp is located in Willard Park on the northwest corner of East 9th Street and Lakeside Avenue, having been installed there in 1991. It has an interesting history that involves Standard Oil (Sohio) and their purchase by BP.

Step 2 - Take a photograph of the subject

I took many photos of the stamp from different angles so I would be able to narrow them down later.

Free Stamp photo - Cleveland Ohio

Eventually, I chose photograph #3, which I cropped and adjusted the color on to account for the overcast day. Here is the final version I used to make the Maze art:

Free Stamp photo - Cleveland Ohio

Step 3 - Draw the Main outline of the subject

Using the photograph in the background I made the maze outline. Here are some points in time during that outline process. You will notice that because this is a digital drawing so I can fix the FREE overlap you see later using layers.

Drawing Free Stamp step 2
Drawing Free Stamp step 3
Drawing Free Stamp step 4
Drawing Free Stamp step 5

Step 4 - Begin the design of the maze

I did not want much difficultly in this maze so I intended to make the dead ends obvious more quickly and have the maze spacing be wide. It seemed natural to make the internal maze lines somewhat match the shape of the sculpture. A typical left to right maze start to finish seems to fit the sculpture. So a relatively simple maze design. I used essentially a free drawn maze construction.

Step 5 - Draw the maze

Below are a few of the points in time in making the stamp maze. Notice that I sometimes rotate the maze in order to make the lines easier to draw at the correct angle. Also notice that the goal of the maze changes late in the process (panel 4) as I have a better idea of how I want the maze solver to maneuver through the maze as I make the internal maze lines. Also in Panel 4 I add a layer to raise the FREE part of the maze above the remaining drawing (most easily seen at the bottom of the last E which no longer has a line thru it).

Drawing Free Stamp step 6
Drawing Free Stamp step 7
Drawing Free Stamp step 8
Drawing Free Stamp step 9

Step 6 - Complete the Maze

Here is the final black and white version of the FREE Stamp maze.

Free Stamp Maze black and white

I like how it came out, but I think this particular subject matter deserves to be tried in color, to see if it will enhance the maze.

Color the Maze (Optional)

Initially I did a basic 2 color approach. Sometimes less is more. Here is the simple red and white version of the maze:

Free Stamp Maze red and white

Not bad. But I thought I could do better with a more detailed coloring similar to what you would see in Willard Park. Here is my preferred and final version in full color:

Free Stamp Maze in color
Free Stamp in Cleveland, OH

I do need to mention that the inclusion of the black pathways changes the way you see the colors you select. If you were to try and color match the photo using the tools in your drawing program the result would look off (usually darker). Better to select the colors and adjust them on your own. Also, in order to see the pathways well, it is important to not make the shadowy underbelly of the stamp too dark !!

All three maze versions work, which do you prefer ? Would you have added the ground underneath, or some background ?

If you like this Making Maze Art Case Study, I will be doing more in the future !

Some other interesting post you may like:

Comparison of the even MORE online maze generation websites

Previously I have reviewed and compared the top 12 maze generation websites. And that blog post gets updated often as new websites are created and replace some of the original sites. It seems to be a common logic and programming puzzle to create a website that can create a digital maze. And so, today, I am going to take the time to go through 7 MORE maze generation websites. Why ? Well I like to keep up to date on what content is out there and share it with you.

So today I will look at 7 online maze generation websites, compare them, and let you know what each is capable of. This maze generator comparison includes the (1) shape of the overall mazes, (2) the cell types or shape of the cells that create the internal paths/walls, (3/4) the width and height sizes you can generate, (5/6) how the start/end are shown, (7) are the solutions given, and (8) how can you download the maze you have generated.

To give them a good comparison I decided to generate a 20x20 maze with each to compare how each generated (when possible). I also tried to give and example of some of the advanced features if the maze generator site has them.

In no particular order:

1. all kids network

Shapes: 5 : Square

Cell types: Square

Width / Height: 9 pre-selected sizes available, smallest 5 x 5, largest 120 x 120

Start/End: Entrance and exit are labeled.

Advanced options: You can choose one of 2 styles: Simple or Artistic

Solution generated: Yes

Downloads available: Yes. Pdfs available.

This site also allows you to select your difficulty level (Easy, Medium, Hard), and to select between 11 different page sizes.

Examples: You must register and login to download mazes. Registration is free.

2. PUZZLE GeneratoRS

This site has 6 different inputs that must be filled in to make a maze. There is no information to explain how they work (Information icons did not work for me). Those inputs are labeled: Width, Height, North, East, West, and South. This site also allows you to make crossword puzzles, sudoku and word searches !

Shapes: 2 : Square, Rectangle

Cell types: 1: Square

Width: 2 - 50

Height: 2 - 50

Start: Entrance and exit are not specified, 1 of each at the top and bottom of the generation.

End: 1

Solution generated: Yes

Downloads available: Yes

Examples: Both are 20x20 squares. The left was generated using 1111 for NSEW, while the right was generated using 2222.

puzzle generators maze example
puzzle generators maze example 2

3. JAMISBUCK

This maze generator is built to generate mazes for Minecraft. This includes mazes with up to 10 layers (Think of a 3D maze with each layer being a floor to a building).

Shapes: 1 : Square

Cell types: 1: Square

Width / Height: Comes in 4 selectable sizes: Small Medium Large and Huge

Start: Entrance on the left hand side.

End: Exit in the right hand side.

Advanced options: The levels I mentioned before add layers to the maze, allowing the solver to travel in a third direction. Note that this generates as a separate picture for each level with blocks colored to indicate where you may move up or down.

Solution generated: No

Downloads available: No

Examples: First example is Medium sized with 1 Level. The next set of 3 show a Small sized 3 level maze where yellow and blue denote the ability to move up and down.

JamisBuck maze example
JamisBuck maze example small
JamisBuck maze example 3
JamisBuck maze example 4

4. Dcode Maze Generator

Shapes: 1 : Rectangle

Cell types: 1: Square

Width: 2 - 50

Height: 2 - 50

Start: Entrance and exit are not specified, 1 of each at the top and bottom of the generation.

End: 1

Advanced options: You can change the walls of your maze to be made by any character. The default maze walls are made from solid black blocks.

Solution generated: No

Downloads available: Yes

Examples: Left with the default black walls. Right with * as walls. I tried a few different symbols and find non-black walls very difficult to follow what the pathways are.

Dcode maze generator example
Dcode maze generator example 2

5. delorie

Shapes: 1 : Rectangle

Cell types: 1: Square, Rectangle

Width: 1 - 100

Height: 1 - 100

Start: Entrance and exit are not specified, 1 of each at the top and bottom of the generation.

End: Entrance and exit are not specified, 1 of each at the top and bottom of the generation.

Advanced options: You can generate a maze in Gif format (Though I could not get this to display) or using text (which uses the “+” and “-” characters). You can choose the width and height of each cell. I found if you use the default of 1 it is difficult to understand the walls of the maze.

Solution generated: Yes

Downloads available: No

Examples: Left uses a width and height of 2 per cell and is difficult to follow. The right maze is much easier to follow by changing the width per cell to 6. This generates a more square maze.

Delorie maze example

6. the teachers corner

Shapes: 1 : Rectangle

Cell types: 1: Square

Width: 10 - 50

Height: 10 - 75

Start: Entrance and exit arrows are chosen with 6 color options. Entrance generates in the top left corner.

End: Entrance and exit arrows are chosen with 6 color options. Exit generates in the bottom right corner.

Advanced options: You can add a Title and directions/instructions for the maze. Default directions are “Can you find your way through the crazy maze below?”. You can change the width of lanes, there are 5 options that vary the display size.

Solution generated: No

Downloads available: Only by right clicking to download directly from the browser. Note that the download will NOT include the start and ending arrows you see on the screen.

Other: This maze generator is part of a larger website dedicated to resources for teachers like lesson plans, activity sets and teacher resources. Great for teachers !

Examples: Each is 20 x 20.

Teachers corner maze example

7. Xefer Maze Generator

Shapes: 1 : Rectangle

Cell types: 1: Square

Width: 2 - 1000 ? At 1,000 the maze still generates.

Height: 2 - 1000 ? At 1,000 the maze still generates.

Start: Entrance and exit are not specified, 1 of each at the top and bottom of the generation.

End: 1

Advanced options: You can choose the size of the cells. You can choose the anfractuosity - roughly how much channels are important in the maze. Most mazes have high anfractuosity.

Solution generated: Yes

Downloads available: No

Examples: Left 20 x 20 has low anfractuosity. Right 20 x 20 has high anfractuosity.

Xefer maze generator example