How to Make a Racing Maze

In a series of posts I will show you how to make a maze in a wide variety of design constructions. The 41st type of maze construction is the Racing Maze. While most constructions are about the making of the specific maze, this one is more about the structure of the maze(s). Let’s define what I mean, then get into the example. At the end of the post I have added a free downloadable maze race book featuring 30 printable maze races !

Racing Maze - A Maze made specifically for racing between two people. The winner is the person that reaches the common goal first.

How to Make a Racing Maze

Before getting into the steps let’s talk about some guidelines for a good racing maze.

  1. It is contained on one piece of paper (and preferably a large one) .

  2. It consists of identical mazes, one on each side of the page which both end at the goal in the center of the paper. An Escape maze is not the best type for a race (though possible) since the multi-goal option is taken away by the common ending.

  3. The maze type should be able to be solved with a writing utensil (to prove the solve has been done). So a maze like an arrow maze would not work easily. Block Move and Warp mazes can also be problematic. If you take a wrong warp an eraser will be needed.

  4. Consider the difficulty you want for the maze. Something too difficult will lower the tension that a more speedy maze will create.

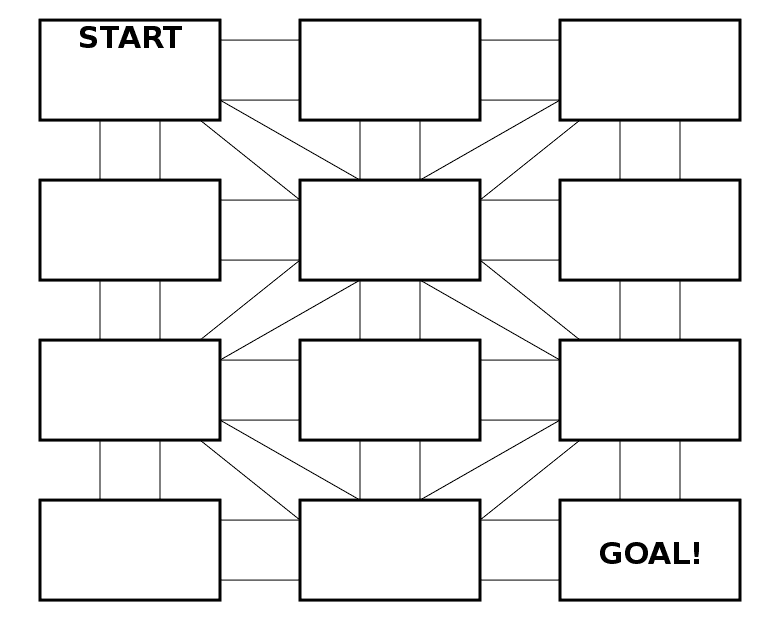
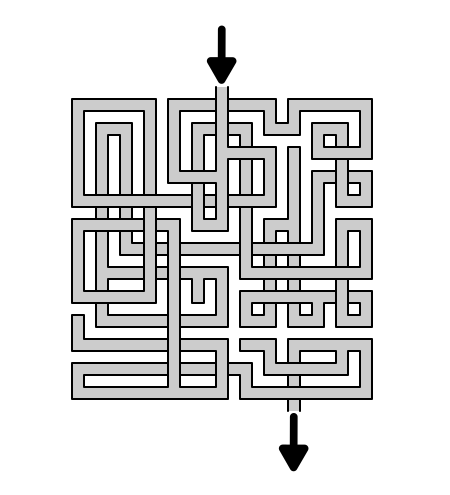
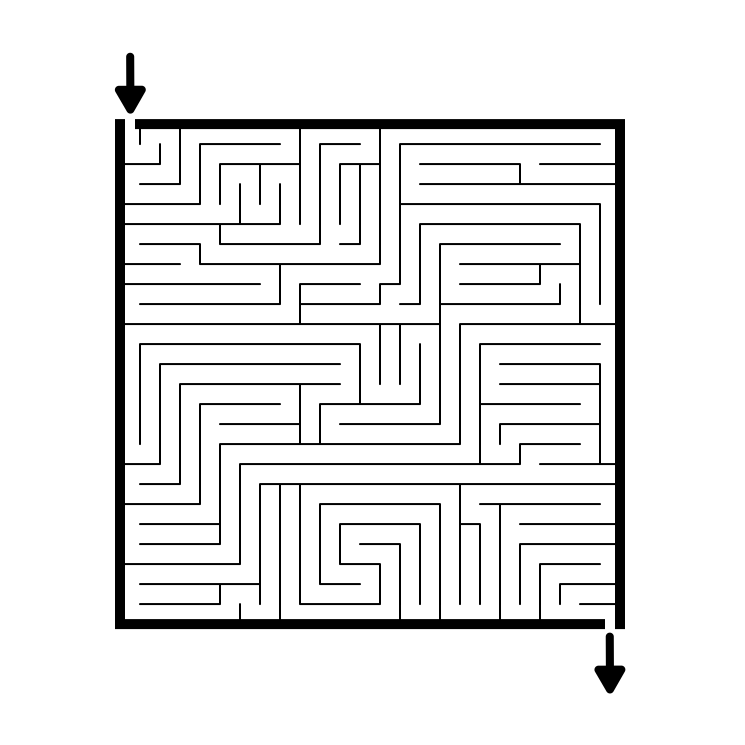
Step 1 - Draw Half of the Maze

I have crammed multiple steps into this because you can use multiple different types of maze constructions, each with its own steps. The key is the maze is drawn to fit on slightly less than half the page. It should start at the bottom of the page and end it the center of the page. You may notice the large gap in the example below….that’s it !

UFO Maze

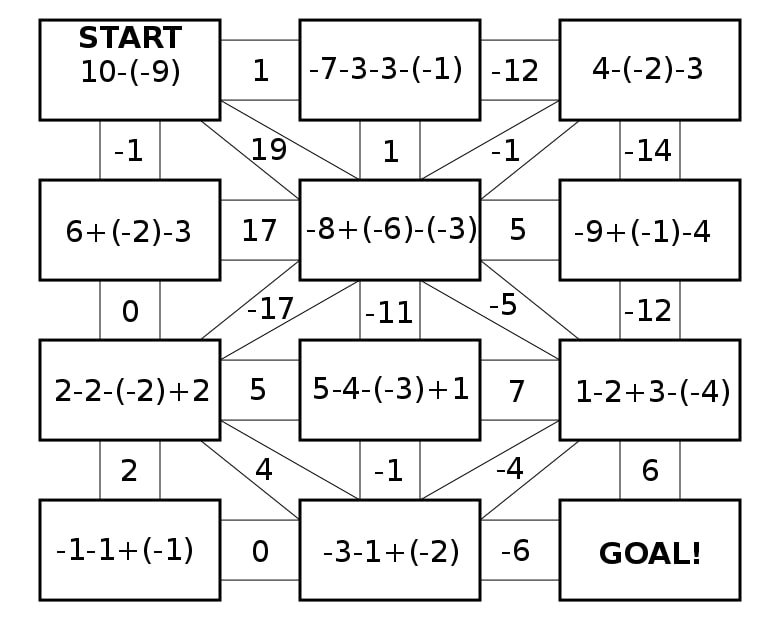
Step 2 - Copy and Invert the Maze

Copy the maze you have made and paste it on the top of the page inverted so it faces the opposite direction. This will create 2 identical mazes on one sheet of paper, with each one facing a person sitting across from the other. You will most likely need to adjust the original placement as everything gets centered !

2 person UFO racing Maze

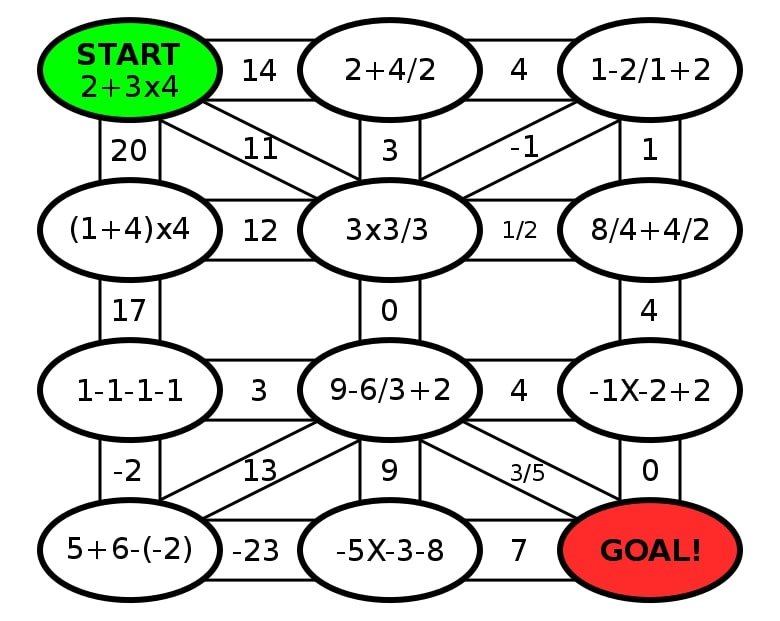
Step 3 - Add final touches

In my example I tag the sides with my website and the name of the maze (or type). I do this because Racing always reminds me of race cars and how they are filled with brand logos. I think this would actually look even better with MORE logos.

2 person UFO racing maze

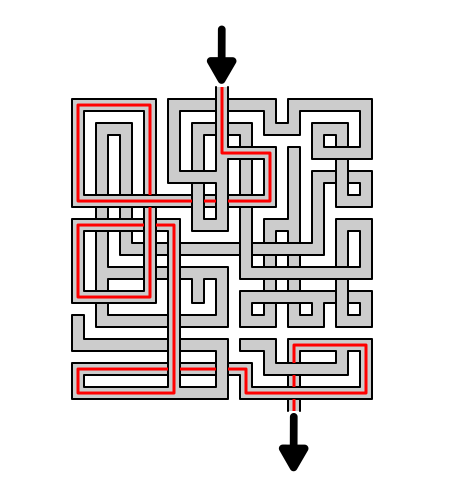
Step 4 - Create the Solution (optional)

My guess is that based on the small size and multiple solvers, nobody will be needing a solution, but feel free to create one if you believe it will be needed.

So, you made a racing maze, but do you know the rules and options for the race ? I have it covered and you can find all the information HERE !

Free Downloadable Maze Race Book

The Maze Racing Book Cover

THE MAZE RACING BOOK

30 pages, 30 Racing mazes

File Size: 365 KB

Features daily mazes from January 2021. Each racing maze is meant to be solved competitively by 2 people starting at the same time. These are mostly easy mazes with a few weaving mazes at the end a bit harder. To learn about race rules To learn about maze racing rules check out this post.

How to Make a Math Maze

In a series of posts I will show you how to make a maze in a wide variety of design constructions. The 40th type of maze construction is the Math maze (a variation of the Number maze). Let’s define what I mean, then get into the example. This maze type is not conducive to outline or shapes so I will use a traditional grid like pattern to illustrate the creation.

Math Maze - A type of number maze where moving from the Start to the Goal is done by correctly answering math problems to move in the correct direction.

HOW TO MAKE A MATH MAZE

  • Step 1 - Draw the Outline Structure

The outline structure of the math maze should include spaces for math problems with multiple possible pathways branching away from it that will include possible answers. Problems can be housed in circles, bubbles, or any other shape you find interesting. My example includes the most common shape - rectangles. You can download 10 free templates here.

  • Step 1.5 - Choose the Start and Goal

No surprise these will typically be on opposite ends of most structures. Remember to leave room in the START square for a math problem ! I always make the final space the GOAL with the last answer leading the solver to it.

Math Maze template 4 x 3
  • Step 2 - Start Adding Math Problems

Unlike most mazes, the Math maze starts with a problem in the first square. In my example I use addition and subtraction of positive and negative numbers, a common problem that is easy for anyone to get incorrect, not just new learners (but especially new learners).

Making a Math Maze step 2
  • Step 3 - Add possible plausible answers

In my example using the addition and subtraction of both positive and negative numbers besides the correct answer there are very common wrong answers. Those should go on the other possible pathways. For the START problem the 3 most common answers are 19 (correct), 1 and -1. If you wanted to lead a student to the correct answer you could use obviously incorrect possibilities like 5 and 7 (but then it would not be challenging). For the second problem there are 8 possible answers (really 7 if you do not consider the path you arrived on). Each number used is a possible answer based on common mistakes so the solver really needs to understand what you are calculating to get the answer correct !

Making a Math Maze step 3
  • Step 4 - Create the Solution

Make the solution to the maze based on the math problems and correct pathways.

Making a Math Maze step 4
  • Step 5 - Create False Pathways

Fill in any remaining blocks with incorrect answers, and alternative math problems. If you want to steer students/solvers towards PAST missed answers you can make the false pathways they have taken CORRECT for the next answer by reverse engineering the next math problem, essentially returning them on the pathway they just came from. This will make the student move back and forth between the two problems - hopefully realizing something must be wrong !

3 x 4 math maze using addition and subtraction
  • Step 6 - (optional) Add Directions

Add directions to explain to the solver how they can move through the maze if you believe it is needed. Most math mazes are self explanatory.

  • Step 7 - Create a Final Solution

Highlight the correct path in the final version of the maze to create the final maze solution (shown here in gold).

Math Maze Solution example

Additional Math Maze Examples

The most difficult thing about making a math maze is the math ! Here is a second example of a Math maze adding in multiplication and division to add difficulty and really test comprehension of the order of operations !

4x3 Math Maze example order of operations

Math Maze based on the order of operations rules

Here is a second example of a math maze that is a bit more complicated than it initially looks. All you need to do is move from start to finish, summing each number you pass over. In order to reach the goal correctly you must reach the number 25 exactly from traversing the maze. So while there are no math problems so solve, there is one large math puzzle. The making of this is very different from my step by step instructions above, so it has it’s own How to Make a Math Addition Trail Maze post.

Math Maze sum to reach the number

And finally if you are looking for a resource that can help you determine what math problems go with what grade level I suggest you check out the Math Worksheet Center.

For my last example I want to make sure you know about Area Mazes. Called a maze, but actually a type of logic puzzle from Japan created by Naoki Inaba. Used to teach Japan children mathematics and logic. Solving requires calculating the area of a rectangle, often multiple times. Also called Menseki Meiro. If you would like to try to solve some, online area mazes can be found here. Or if you want to read my review of 2 Area Maze books, check this out.

In the below example (you are trying to find the area of the blank box) you would first solve the wall under the # 12. You solve the equation 4 * X = 12. So X = 3, meaning the bottom left side of the square has a length of 3. Now you can solve using the 3 and the 21 to calculate the length of the left side of the square above the 4. Solve 3 * X = 21. The answer is 7. Continue this to solve the Area Maze.

Area Maze example

MATH MAZE OR NUMBER MAZE ?

There are a few examples that fall into a grey area between what I call number mazes and what I call Math Mazes. Number Mazes aren’t so much about doing math as counting by a certain number, like 7 in the first example below. You can learn how to make number mazes here. The next 2 examples are probably math mazes but if you called them number mazes I would not fight you. The middle example you need to understand which numbers are divisible by 3 to solve (seems like a math maze to me). The last example you need to know what an even number is and strategically move to a higher even number to solve the maze (number maze?). My point is you can get creative depending on what you are attempting to teach !

Count by 7's math maze
Divide by 3's math maze
Higher evens math maze

Other posts you may be interested in:

Mazes of all 50 US states for Kids, each maze includes the state capital, year of statehood, state motto and more.

A collection of free downloadable Kids Activity Books.

Step by step instructions on how to make over 40 different types of maze.

Instructions on how to make labyrinths.

How to Make a Weaving Path Maze - Improved Method

In a series of posts I will show you how to make a maze in a wide variety of design constructions. Previously, we reviewed the 29th type of maze construction - the Weaving Paths maze. Today I will give you an alternative method (an improved method IMO) of making a weaving path maze. The main difference between the two methods is the resulting spacing of the paths in the final product. This method will result in a more uniform design. Let’s review what I mean by a Weaving Paths Maze, then get into the example.

Weaving Paths Maze - A Maze WHERE paths are allowed to weave around each other creating an extra plane for the maze solver to work in.

How to Make a Weaving Paths Maze (IMPROVED METHOD)

Step 1 - Draw a “picnic blanket” template

The template will serve as the shape of the maze and also help you keep track of spacing as you make the actual maze. It can be anything from a simple shape like a square, to a complex picture. My example uses a simple square structure. I use 2 colors to help keep the construction organized. This background will organize the drawing of your pathways. I have a rule that no pathways can be drawn in the white boxes. This picnic template creates that structure for you.

Pink and white grid

Step 2 - Start Drawing the Pathways

While most mazes are built by individual walls, in a weaving maze you design a pathway by virtue of the parallel walls you are drawing. A weaving pattern is achieved by controlling the direction of paths rather than the building of walls. Using the template, ensure you only draw pathways on the colored part and never on the white portion of the grid. This ensures good spacing. I draw a section at a time and use a color (I prefer grey, but feel free to choose your own color) to help establish the maze from background.

You also must follow a few rules: Do not end a maze path under another pathway. Do not change pathway directions under another pathway. Do not split a path way into multiple pathways under another path. Basically, only create dead ends in open space.

271 Weaving Maze ALT Start Paths.png

Step 3 - Draw additional paths

Continue drawing pathways making sure you take advantage of the weaving. Here is a mid-completion look at the maze construction.

A note on difficulty and fun-ability: Remember that in a weaving maze the more loops you create the more difficult the maze will be to solve. But, those loops also add a bit of fun to the maze solve also. If a solver incorrectly takes a false pathway and instead of reaching a dead end the loop will return them to the mistake (Much more fun to solve!!!).

272 Weaving Maze ALT More Paths.png

Step 4 - Complete all pathways

Complete all pathways, ensuring that you have made a viable solution !

273 Weaving Maze ALT Finish Paths.png

Step 5 - (Optional) - Add directional arrows or shadows

If you believe the final version of the Weaving path maze you have made has paths that might confuse the solver you have the option to add arrows at any dimensional intersection to clarify the path can be taken. I think this maze does not need any arrows. I also sometimes use shadows to show where a pathway goes under another pathway (best seen in my Pipe maze example).

Step 6 - Complete the Finishing Touches

Add the Start and Goal arrows (could be done sooner), and delete the background guide template.

275 Weaving Maze ALT Delete background.png

Step 7 - (Optional) Create a Background

Make the maze completely black. Copy and shift it and return it to the original coloration to create a shadow background. I think this helps to make the maze look more dimensional and easier to follow for a solver. Notice that this also makes the pathways look darker (I did not change the color between steps). Depending on what colors you use this color dynamic will change.

weaving pathways maze example

Step 8 - Draw the Solution

Highlight the correct path in the final version of the maze to create the final maze solution (shown here in red).

Weaving pathways maze solution

Additional Weaving Maze Examples

The below example of a weaving path maze was made without a template guide. It has irregular spacing between pathways and many large gaps vs. the improved method. Depending on how you want your final maze to look will determine if you use the guide or not. One other thing to note about this version is that the black and white pathways on a white background make it difficult on my eyes. I would actually prefer this maze more if the pathways had a color.

Poor Weaving Maze example

One more example made with a guide and even spacing, no gaps. This also adds some color and a new shape. I did not use a background. Obviously the template used to make this had the same shape as the final maze.

Aqua Diamond shaped Weaving Maze

That inspired me to show you a few examples of weaving maze templates. Get creative on your own templates. Just an additional note - make sure to fill in all spaces to create the shape when you are actually making the maze. It requires a little more on-the-go planning as you create the maze.

Weaving Maze Template - diamond shape
Weaving Maze Template - butterfly
Weaving Maze Template - club shape

Another example that I did for Christmas, a Weaving Christmas Stocking Maze. It uses multiple colors and a unique shape.

Christmas Stocking weaving maze

And my last example showcases a large version of a weaving maze. This is difficult maze but a lot of fun to solve.

Large Weaving Maze example

For additional examples, explore the 10 different types of weaving maze styes, including pipes mazes and see which you prefer:

What is Your Preferred Weaving Maze Style ?

I also created a method to help create a complicated weaving maze that I found very helpful when making this maze type for adults:

Creating a complicated Weaving Maze - an updated method

I did a 3 part blog series on maze constructions if you want to design your own type of maze. Part 2 speaks about pathway options including weaving pathways !

Part 1 - Starting and Ending a Maze - Speaks to the 9 most popular ways to start and stop a maze

Part 2 - Maze Path options - Explores the 12 different pathway options for a maze

Part 3 - Conditional Path options - Speaks to 11 different conditional options to add to a maze to make it more enjoyable

Interested in learning how to make or draw other types of digital mazes ? I have step by step instructions on how to make over 40 different maze types.

If you prefer making labyrinths, you can find step by step labyrinth making instructions.

How to Make an Unsolvable Maze

In a series of posts I will show you how to make a maze in a wide variety of design constructions. The 39th example will look at the Unsolvable Maze construction. It is one of the most enjoyable maze constructions to make. Let’s define what I mean by Unsolvable Maze, then get into the example. Every example will use the sample basic outline (the state of Ohio) to better illustrate the differences between each maze type.

Unsolvable Maze - A maze that doesn’t have a solution.

(ALTERNATIVE definition) A maze so difficult that the solver gives up rather than continue solving it.

There are 2 completely different options to create an unsolvable maze; Option 1 - Create a maze with no solution, and Option 2 - Make a maze with extreme difficulty. Let’s review the steps for each making each type of maze:

HOW TO MAKE AN UNSOLVABLE MAZE - Option 1: No Solution

  • Step 1 - Choose Your Maze Construction

This step-by-step will be much different than previous “How to Makes”. An unsolvable maze can come in ANY maze construction. So determine which construction you prefer.

  • Step 2 - Follow the Step by Step Instructions

  • Step 3 - Close off any Solutions

And there it is. When you make the maze do not leave any solution possible. This is mean. But maybe that is why you are here. To make this even more difficult close up a point in the middle of the maze (not at the end). If you close all possible solutions pathways near the exit, a backward solver will easily figure this out. I assume a designer of this would want to be at their most terrible.

Unsolvable Maze shaped like Ohio

Below is an additional example. Unless this is for April Fool’s Day, or you made a mistake, creating a maze like this is not advisable.

Unsolvable maze example

Below I will discuss how to make an Arrow Maze that is very difficult. But there is also the option to create an Arrow Maze with dead ends (unlike other maze types, a properly designed Arrow Maze does not have any). In this first example there is NO solution and if you try to solve it you will eventually find yourself in an everlasting loop ! Try it for yourself.

Arrow maze with continual loops and no solution

HOW TO MAKE AN UNSOLVABLE MAZE - Option 2: Extreme Difficulty

This second option is a variation on the above instructions with a variation only in step #3.

  • Step 1 (same as above) - Choose Your Maze Construction

This step by step will be much different that previous “How to Makes”. An unsolvable maze can come in ANY maze construction. So determine which construction you prefer.

  • Step 2 (same as above) - Follow the Step by Step Instructions

  • Step 3 - Make it REALLY difficult to solve

Make a maze that is extremely difficult to solve using the following 9 things in your toolbox:

9 Designs Decisions That Make a Maze Difficult to Solve:

  1. Make it very large because the larger the maze the more difficult it can become. The more dead ends. The more pathways to keep track of. Just more.

  2. Make a very high number of intersections. The more choices the solver has to make, the more often they will make a wrong turn. Simple math.

  3. Make the dead end pathways very long. When you create a dead end, don’t make it obvious just after the choice is made. Make the dead end take a long time to be discovered.

  4. Make many branches off of the dead ends pathways. So you take a long dead end pathway but do not discover it for a long time so you backtrack to your last intersection and take the other branch and it is a dead end also. So you backtrack again to the previous intersection and take the other direction and it is a dead end also ! etc.

  5. Include a few looping dead ends. What do I mean by this ? Well, have an intersection that breaks off into two directions (again, preferably these are long pathways), which both lead back to the exact same spot in the maze. The more looping pathways, the more difficult the maze to solve. It may make the maze less frustrating depending on the temperament of the solver. Would you rather hit a dead end, or not hit a dead end and return to where you started ?

  6. Consider using weaving pathways. These paths go under and over one another and make seeing dead ends “early” much more difficult. Weaving Mazes and Pipes Mazes both use this construction method.

  7. If you are making a specialty maze, give the solver an exponential number of possible moves they can make (see the Slide Arrow Maze example below). An intersection with 4 choices is more difficult to keep track of than an intersection with only 2.

  8. Design the maze in TWO directions. This prevents a person from backtracking to solve a maze from the goal to the start.

  9. Add Rules. The more you need to think when solving a maze, the harder it becomes. For example: Puzzle Mazes have rules of movement to follow based on the rules of the maze. Conditional mazes make the order you move down pathways important. Left turn only mazes speak for themselves in their title.

I do NOT suggest using this method to make a maze unsolvable:

  • Make the pathways very small or in poor colors (because both are difficult to see), with the need to strain your eyes to solve it. Don’t make a maze designed to be difficult to follow/see, make a maze design that is difficult to SOLVE because it is a complicated puzzle.

EXAMPLES OF VERY DIFFICULT MAZES

The first example is a Slide Arrow Maze. In this type of maze you start at the red arrow and you may move to any block that it is pointing to (but no jumping gaps). So your first move can be to either of the two blocks below it. If you pick the first block below you have 3 subsequent choices. If you pick the second possible arrow you will then have 8 possible next moves. Why this maze is so difficult is that there is only one correct solution, so with so many choices each move you are bound to make many mistakes and get stuck ! Try it. I WANT the solver to get frustrated.

Very difficult Slide Arrow Maze

And this second example I did for a project. This is a regular Arrow Maze, but it is also the largest Arrow Maze in the world (probably). This is difficult because of its sheer size. I gave a few checkpoints along the way (the blocks with the black background). It also includes hundreds of loops. I think it is a fun maze, but I think many people will get frustrated and stop. If you do try to solve this maze, time yourself and send me a note on how long it took you ! This maze is one of The 5 Hardest Mazes on this Website.

Here are the solving rules if you have never done an Arrow Maze:

Rules to solve an Arrow Maze
The Largest Arrow Maze in the World

Good Luck designing an unsolvable maze !

Interested in learning how to make or draw other types of digital mazes ? I have step by step instructions on how to make over 40 different maze types.

If you prefer making labyrinths, you can find step by step labyrinth making instructions.