Arrow Maze Design Case Study - Part 1 Start Locations and Options

One of my favorite types of mazes to make is the Arrow Maze. I have a book on Amazon of 100 Arrow Mazes, and it is one of the few ,and possibly only? maze book that is available on Kindle. This is because an Arrow Maze can be solved WITHOUT a writing utensil. In fact most people use their eyes or a hovering finger to solve an Arrow Maze. In a series of 14 posts I will be going through some of the design decisions that go into making a successful and fun Arrow Maze. I will be going to extremes in many of these to make the point more impactful.

The 14 part series has 3 major themes we will delve into; Arrow Maze Construction and Design, Arrow Maze Components and Extreme Arrow Maze examples.

Here is an overview of what we will be covering in the 14 part series:

Arrow Maze Construction and Design:

Arrow Maze Components:

Extreme Arrow Maze examples:

Arrow Maze Design Case Study - Part 1 - Start Locations and Options

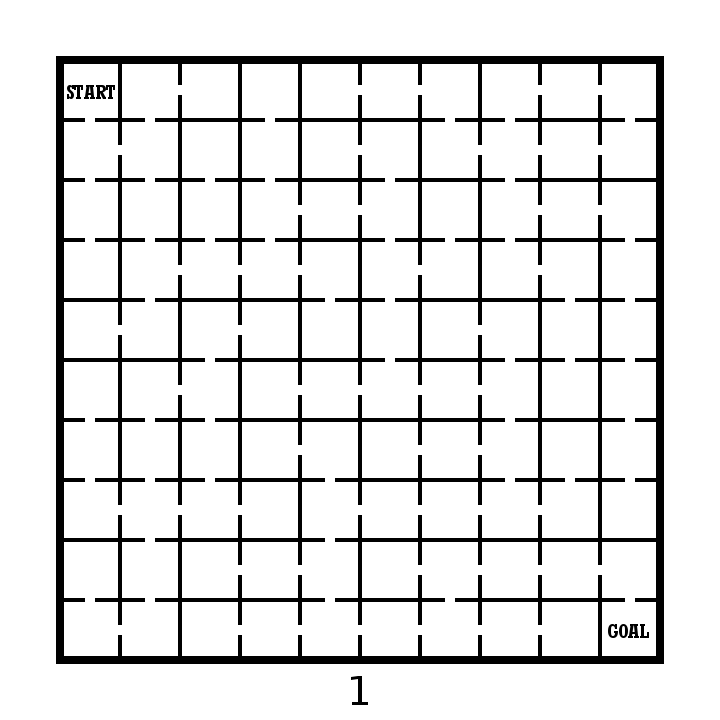
Making an Arrow Maze start with where you place the START block in the maze. Seems like an easy decision, but there are a few things for you to consider. We will look at a total of 15 different examples, using mini grids to represent larger mazes. Beginning in the top left and moving left to right using our example below:

Corner Starts: you have 3 blocks to work with which can have pathways either in, or out (left). You can use an intersection arrow to create an additional pathway out (center). You can also force a direction for your solver as in the top right example where all 3 initial options lead to the same arrow eventually (right).

Edge Starts: moving away from a corner with the START block gives you an additional 2 blocks for pathways either in or out. You have 5 blocks to work with using any combination of pathways in/out (left, right). You may maximize your out pathways again by using intersection arrows, jumping your pathways to 7 (middle example).

Center Starts: For maximum pathway options you can use a center placed block. This will give you 8 pathways full of regular arrows (left, right). Again using intersection arrows you can maximize your pathways at 12 (center).

Arrow Maze starting options explained

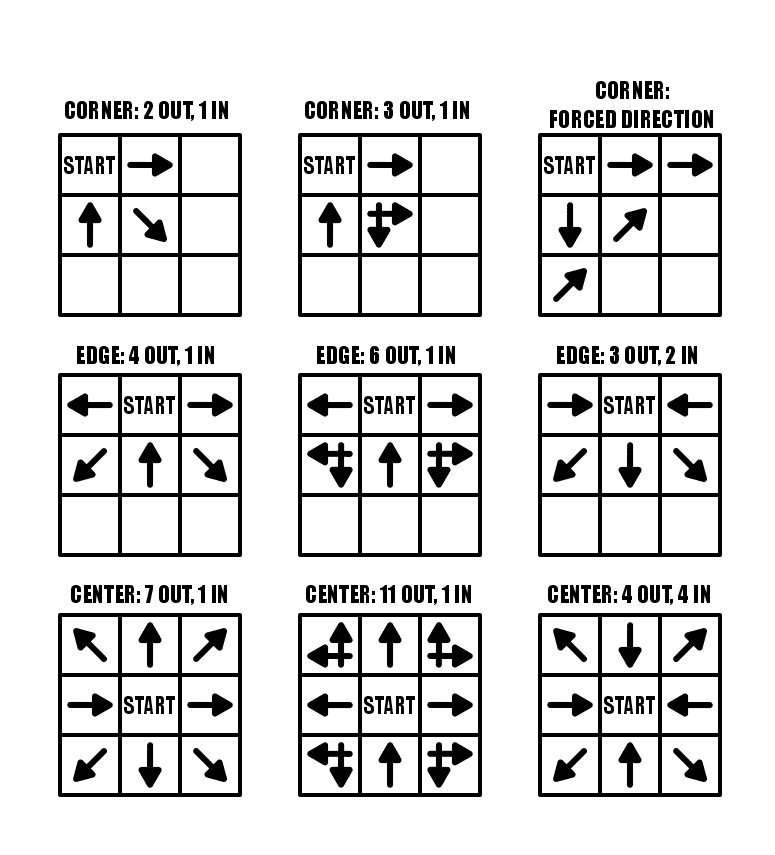
Arrow Maze START options

The summary for these options is that the farther from a corner/edge you place the START. the more options you have.

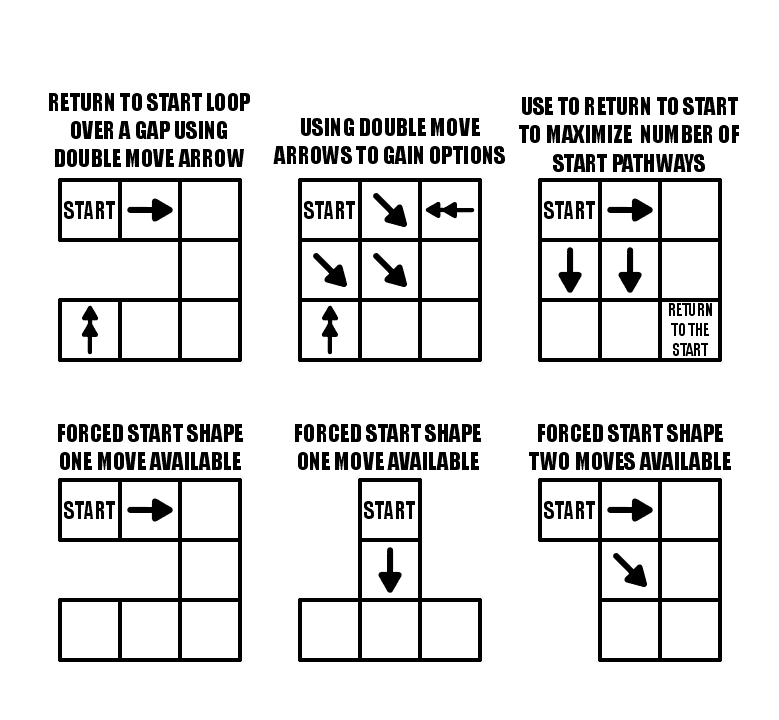
Let’s look at 6 additional examples with some more complicated STARTs.

Double Arrows: Our first example uses a forced start (there is only 1 choice), but if you want to lead a solver back to the START you can use a Double Arrow to get there (in this case over a gap). The second example uses all 3 blocks as OUT pathways, but uses 2 double arrows to get the solver back to START if they take an incorrect choice. Another way to achieve this, meaning using every block as an OUT pathway from START is to use a RETURN TO START block somewhere in the maze.

Forced Starts: You can use the shape of the maze to create forced moves. The first two examples in row 2 below only allow 1 move, while the third example gives you 2 options. Basically you are placing the START in a position that limits the choices.

Arrow Maze starting options - forced start explanations

You have a lot of options with the START block. Consider the difficulty you want with your maze when you place your START block.

And now a Special case…..the Slide Arrow, which will be a part of a future case study. A slide arrow allows you to slide to any block that it is pointing towards (but not over any gaps)….so using a slide arrow really gives you many additional options. Check how quickly the numbers get large…basically however wide or tall the maze is !!

Slide Arrow Maze starting options explanation

Coming up next in Part 2 - Using Creative Shapes, where we will examine what shapes can be used to create an Arrow Maze !

Maze Design Case Study - Designing a Grid Maze in Different Difficulty levels

I wanted to do a case study showing how to create a maze in a few different difficultly levels. I thought the best way to illustrate this was to design a create a maze with a variety of different branch types included then have you solve them and compare how enjoyable each was for you to solve. Let’s jump into the example and you’ll see what I mean. (Hopefully).

  • Example - Part 1. Please solve this small 10x10 grid maze. Yes this is an interactive example !

10x10 grid maze solving example

OK. Take note of how your experience was solving the maze. Did you enjoy it ? How quickly did you solve the maze ? Anything you did not like about the experience ? Did you find it to be enjoyable or frustrating ?

Now lets try this maze made on the same grid structure. We have 10x10 grid maze with the Start and Goal placed in the same locations.

  • Example - Part 2. Please solve this small 10x10 grid maze.

10x10 grid maze solving example 4

I have the same questions for you as before. How was your experience was solving the maze ? Did you enjoy it ? How quickly did you solve the maze ? Anything you did not like about the experience ? Did you find it to be enjoyable or frustrating ?

An finally in Part 3 we will group 2 additional mazes together for evaluation. Same questions will apply.

  • Example - Part 3. Please solve each of these small 10x10 grid mazes.

10x10 grid maze solving example 2
10x10 grid maze solving example 3

So what have we learned ? Before I go into some explanations on the design of each maze take a minute to hypothesize on what you think just happened. 4 similar mazes. Hopefully they gave you different experiences for you when you were solving them.

4 Maze Comparison - The Differences and Design Choices

  • First, did you notice each maze has the same exact solution ? Mazes 2 & 3 have the inverse (or flipped) solution of mazes 1 & 4. So the solutions are essentially all equal.

  • Each numbered maze should have gotten more difficult as the numbers increased (although with a small maze size this may have been somewhat less obvious)

  • Maze 1 - Short dead ends. Incorrect paths do not have branches. Pathways are wide. Some paths are “filler” and unusable.

  • Maze 2 - Longer dead ends. Incorrect paths do not have branches. Pathways normal width.

  • Maze 3 - Long dead ends with additional branches off of them. Pathways slightly smaller.

  • Maze 4 - Long dead ends with choices and branches off them. 4 way choices included. Small pathway widths.

So to summarize I used the following to change the difficulty of the 4 mazes:

  • The length of dead ends - How fast you know you have made an incorrect choice

  • Dead end branches - When you make a wrong turn are there multiple incorrect choices on that branch

  • Expanded pathway choices - Some intersections have multiple choices

  • Pathway widths - Smaller pathways are more difficult to see and navigate.

  • Unusable pathways - Filler sometimes used to fill a maze out while keeping it at the desired difficulty level.

Let’s look at the pathways coded to show what I mean. The red line is the solution. The blue line is the false pathway. The purple line is an unusable pathway (Did you know some mazes use this ?)

What you need to notice in the below deconstructed mazes:

  • Maze 1 - Thick pathways make this maze easier to solve. The purple lines to not connect to anything - essentially they are filler and unusable pathways. Most likely you did not notice them. They make the maze easier. The blue lines, the incorrect dead end paths - are short and only extend 2 levels before letting the solver know it was the wrong choice.

  • Maze 2 - Normal pathway width. No purple pathways from here on out. The blue lines are long but have no branches off of them. Longest length is 11 blocks.

  • Maze 3 - Pathways are a bit thinner. The blue dead end lines now have branches, so wrong turns have additional wrong turns. None of these, however has more than one additional dead end branch. There is also a dead end choice at the starting block.

  • Maze 4 - Pathways are very thin. There are now 3 intersections where 4 pathway choices are included (they look like a plus sign in this grid maze). Dead end branches also have multiple dead ends off of them.

four 10x10 grid maze solving example solutions

Hopefully this explanation and example shows you a small piece of how maze difficulty can be designed and changed with a few different choices. Most solvers would prefer Maze #1 because the wrong turns are not overly punishing. But a nice amount of people would prefer something a bit more challenging also, so remember the audience you are designing for when you create your mazes !

I will say that there is a balance between making a challenging maze and poor maze design. Do the pathways need to be ultra thin or are you just straining the eyes of the solver ? I think a re-design of Maze #3 with thick pathways would be both enjoyable AND challenging ! Happy maze-ing !

Additional popular posts you may like:

How To Make A Grid Maze

44 Different types of Mazes and Labyrinths

Comparison of the Top 10 Maze Generation Websites

Using color for Maze pathways - A Case Study

Today I will explore the use of colored pathways as a choice when creating a maze and show how that decision will impact the look of the maze. Previously I looked at 12 different pathway options with #11 being using colored pathways. As an example I used the red wine maze. As you can see the burgundy pathways define the wine resting in the wine glass. Easy to understand for the viewer/solver.

Red Wine Maze

But that maze is the end product, a result of a construction decision that I think was the correct one. Let’s look at a different maze that could be created with or without colored pathways and see what happens as we make different selections.

For our example we will be doing the famous Route 1 road sign from California, also known as the Pacific Coast Highway or simply the Coast Highway.

Maze Design 1 - Colored background used

Looks like the sign you might see on the side of the road (mazed!)

California Highway 1 Maze

Route 1 Sign Maze

Maze Design 2 - Pathways colored as is

For our second example we simply lose the background color and change the pathway color to the former background color. The maze sign is recognizable, but the color is very subtle but visible. For some designers this would be an acceptable solution. In this instance I would want this maze to have a bit more color….so

California Highway 1 Maze skinny walls

Maze Design 3 - Pathways colored, but twice as thick

So I took the maze above and doubled the thickness of the lines to increase the appearance of the color in the background. It definitely works to achieve more color. And, depending on how you feel about the maze you have designed this might be a great solution. But there are 2 more options, best these options should be decided on before you have started mazing.

California Highway 1 Maze - medium thickness walls

Maze Design 4 - Twice the pathways, original thickness

This option will make for a maze that is twice as long (or at least has twice as many pathways). For the example I cut the original maze in half (not recommended) to quickly construct it. The result is a darker background, a more difficult maze, and a longer design and drawing process. This is a nice option if you want to increase difficulty. There is certainly enough space to make this complicated ! We do have 1 more option to look at…

California Highway 1 Maze - many  pathways

Maze Design 5 - Twice the pathways, double thickness

To bring the options full circle I took Maze design 4 and doubled the thickness of the pathways as I had before in Maze Design 3. The width almost switches this maze from a standard maze construction to a standard equal maze construction. Lots of color in this one.

California Highway 1 Maze - many thick pathways

So those are 4 possible designs for the same maze, with 4 different colored pathway options. I wanted to illustrate that the use of color is about more than color you assign the path, but also about their spacing and their thickness. Any could be used depending on how you want the final maze to look and the difficulty you want to give the solver. Here is a comparison of all 4 colored pathway examples together so you can more easily compare them. Which do you prefer ?

Example of how wall thickness changes how a maze looks

Maze options - Conditional Path options

Welcome to Part 3 of my 3 part series on maze construction options. Previously, I gave you step by step instructions to make over 40 different maze constructions. But making a maze also means making a series of different decisions, each that will change the look and difficulty of the maze. Here are the Parts we will cover in the series:

Part 1 - Starting and Ending a Maze

Part 2 - Maze Path options

Part 3 - Conditional Path options

Let’s get started with Part 3: Conditional Path Options

In Part 1 we looked at starting and ending your maze. In Part 2 we looked at all the different options for making your pathways. Today we look at a specific subset of maze construction that I call Conditional Path Mazes. This group of mazes is a choice you make as a maze maker to give your solver a bit of an extra challenge. Call them what you want, but can they follow a set of guidelines, conditions, or rules to solve the maze ? Let’s look at types:

1 - Find Items Maze

This is a simple condition mostly. You move through the maze from start to finish, but along the way there are places you need to visit to essentially find items, thus the name. It also works well for Map mazes, where finding the item, or visiting the city is the goal of the maze. Here’s a Germany maze for example:

Note: A subset of this version would be the find items in order maze, where you stipulate the order things must be found/visited.

Germany Map Maze

2 - Avoid Items Maze

The opposite of finding is avoiding, at least for maze construction. This is a natural option for mazes, after all you are already avoiding dead ends !! Really these Avoid Items just create artificial dead ends within the maze, and hopefully help tell a story. Like this example of a Fish avoiding hooks. I could have made more walls but what fun is that ?

Kids Maze - Fish finds a worm

3 - Directional Mazes

A maze that states the directions you may move in is a directional maze. To reference Part 2 in the series on pathways, this could be a regular pathway or online. Below is an On Line Maze with the condition that you can only turn left to solve it.

Left Turn Only Maze

4 - Puzzle Maze

The condition of this maze type determines your movement. This means solving a puzzle to determine your movement thru the maze. In the first example below the movement is determined with a key - you must follow the directions to solve the maze and there are no choices, but with the 2nd puzzle movement is determined by rules - and there are multiple possible ways to move between grids.

Puzzle Maze
Puzzle Maze #2

5 - Letter Maze

Simply the rules involve letters…and in this version you have choices on where you move…i.e. this M or that M from START.

Letter Maze

6 - Number Mazes

Or similarly, numbers to determine movement. This particular variation is based on division and is a Counting maze.

Count by 3's Kids math maze

7 - Color Grid Maze

Movement thru the maze is determined by following a series of colors in order.

Color Grid Maze

8 - Conditional Color Path Maze

Similar to #7 but the pathways change colors rather than being colored blocks. As someone who makes a lot of mazes these are both fun and challenging to create. The non grid format gives you options to get complicated and math-y !! If you are a maze maker I suggest you try to make one of these.

Conditional Pathway Maze

9 - Non Reusable Pathways

This is used in a Go & Return Maze and sometimes in Find Items Mazes. The solver is asked to move thru the maze and never visit the same place more than once while solving. These tend to have “open floor plans” when it comes to walls. You want freedom of movement and choice to complicate the solve.

Kids Find Items Maze -Ants find sugar

10 - Go & Return Maze

A Go & Return Maze is part #9 Non-reusable Pathway and part #1 Find Items Maze combined with a Start/Goal that is the same. So maybe this is a combination of things we have already covered, and maybe it isn’t. I thought it was unique enough to get it’s own option. In a Go & Return Maze you go from start to an internal part in the maze, then return back to start without using the same path. Those are the conditions to solve ! Here is an example:

Triangular Go and Return Maze

11 - Math Maze

A variation of the number maze where your movement is determined by needing to solve a math problem to correctly advance. If you are interested I have made 11 different Math Maze Templates that are free to download.

Order of Operations Math Maze